
In this post, we will create a Spring Cloud Function and create some unit tests for it. We will do so by creating a function with Bean definition and with the functional style. At the end, we will deploy the function on AWS Lambda.
1. Introduction
Spring Cloud Function allows us to implement business logic via functions and we can create a Spring Boot application just as we are used to. You can run the function locally but of course it is the intention to run it at some serverless provider. We will show both cases in this post and will use AWS Lambda as serverless provider. You will need to create an AWS account first. See our previous blog How to Deploy a Spring Boot App to AWS Elastic Beanstalk how to create an AWS account. The sources of the examples we are using, can be found at GitHub.
Detailed information about Spring Cloud Function is available in the official documentation.
2. Create Function With Bean Definition
We will create a function in the traditional style with Bean definition. Our function will accept a String and verify whether the word cloud is present in the provided String. The function returns true if present, otherwise false. A very basic function, but this will allow us to focus on some basic principles instead of a complex piece of business logic. The source code is available in branch feature/function-with-bean-definition.
Go to Spring Initialzr, leave the defaults and add dependency Spring Cloud Function. Also, checkout the Explore button in Spring Initializr, it is really awesome! After importing the project in our favourite IDE, we create the function.
@SpringBootApplication
public class MySpringCloudFunctionPlanetApplication {

    public static void main(String[] args) {

   SpringApplication.run(MySpringCloudFunctionPlanetApplication.class, args);
    }

    @Bean
    public Function<String, Boolean> containsCloud() {
        return value -> value.contains("cloud");
    }

}
This is quite simple, isn’t it? Just a basic Spring Boot application with a single Bean. Now, in order to be able to invoke the function via a http endpoint, we only need to add the spring-cloud-starter-function-web dependency to our pom.
<dependency>
    <groupId>org.springframework.cloud</groupId>
    <artifactId>spring-cloud-starter-function-web</artifactId>
    <version>3.0.10.RELEASE</version>
</dependency>
After doing so, run the application:
$ mvn spring-boot:run
Verify the function for a true result:
$ curl -H "Content-Type: text/plain" localhost:8080/containsCloud -d 'this is a cloud'
true
Verify the function for a false result:
$ curl -H "Content-Type: text/plain" localhost:8080/containsCloud -d 'this is a function'
false
Instead of testing the function manually, we can also create some unit tests for it. Nothing new when you are familiar with creating unit tests for a Spring Boot application.
@SpringBootTest
@AutoConfigureMockMvc
class MySpringCloudFunctionPlanetApplicationTests {

    @Autowired
    private MockMvc mockMvc;

    @Test
    public void doesContainsCloud() throws Exception {
        MvcResult result = this.mockMvc.perform(post("/containsCloud").contentType(MediaType.TEXT_PLAIN).content("this is a cloud")).andReturn();
        mockMvc.perform(asyncDispatch(result)).andExpect(content().string("true"));
    }

    @Test
    public void doesNotContainsCloud() throws Exception {
        MvcResult result = this.mockMvc.perform(post("/containsCloud").contentType(MediaType.TEXT_PLAIN).content("this is a function")).andReturn();
        mockMvc.perform(asyncDispatch(result)).andExpect(content().string("false"));
    }

}
Build the application together with running the tests:
$ mvn clean install
3. Rewrite Function to Functional Style
Now that we have created the function with traditional Bean definition style, we can now rewrite the application by using the functional Bean definition style. The code is available in branch feature/function-with-functional-style. Reason for choosing the functional style above the traditional style is the major improvement in startup time. In our example, the startup time with traditional Bean style is about 1s and with the functional style about 250ms. We need to change the following in order to rewrite the function:
@SpringBootApplicationbecomes@SpringBootConfiguration, we do not enable Spring Boot autoconfiguration with this, but mark the class as an entry point;- The main class becomes a
ApplicationContextInitializer; - The
SpringApplicationbecomes aFunctionalSpringApplicationwhich is a subclass ofSpringApplication; - We remove the
@Beanannotation and implement theinitializemethod and register the bean(s) over here.
The end result is:
@SpringBootConfiguration
public class MySpringCloudFunctionPlanetApplication implements ApplicationContextInitializer<GenericApplicationContext> {

    public static void main(String[] args) {
        FunctionalSpringApplication.run(MySpringCloudFunctionPlanetApplication.class, args);
    }

    public Function<String, Boolean> containsCloud() {
        return value -> value.contains("cloud");
    }

    @Override
    public void initialize(GenericApplicationContext context) {
        context.registerBean("containsCloud", FunctionRegistration.class,
                () -> new FunctionRegistration<>(containsCloud())
                        .type(FunctionType.from(String.class).to(Boolean.class)));
    }

}
Running the application will cause the following error:
org.springframework.beans.factory.BeanCreationException: Error creating bean with name 'org.springframework.cloud.function.web.source.FunctionExporterAutoConfiguration': Post-processing of merged bean definition failed; nested exception is java.lang.IllegalStateException: Failed to introspect Class [org.springframework.cloud.function.web.source.FunctionExporterAutoConfiguration] from ClassLoader [jdk.internal.loader.ClassLoaders$AppClassLoader@5bc2b487]
...
Caused by: java.lang.ClassNotFoundException: org.springframework.web.reactive.function.client.WebClient$Builder
It appears that the FunctionalSpringApplication approach is tightly coupled to WebFlux. See also the GitHub issues 459 and 467. The issue is seen as an enhancement because it apparantely never worked. For now, the solution is to use spring-cloud-starter-function-webflux instead of spring-cloud-starter-function-web. Change the pom accordingly:
<dependency>
    <groupId>org.springframework.cloud</groupId>
    <artifactId>spring-cloud-starter-function-webflux</artifactId>
    <version>3.0.10.RELEASE</version>
</dependency>
Running our tests will fail now:
Caused by: org.springframework.beans.factory.NoSuchBeanDefinitionException: No qualifying bean of type 'org.springframework.test.web.servlet.MockMvc' available: expected at least 1 bean which qualifies as autowire candidate. Dependency annotations: {@org.springframework.beans.factory.annotation.Autowired(required=true)}
First of all, we need to use the FunctionalSpringBootTest annotation. Secondly, because we are now using the WebFlux dependency, we need to rewrite the tests in order to use WebClient instead of MockMvc. It is quite similar as MockMvc as you can see:
@FunctionalSpringBootTest
@AutoConfigureWebTestClient
class MySpringCloudFunctionPlanetApplicationTests {

    @Autowired
    private WebTestClient client;

    @Test
    void doesContainsCloud() {
        client.post().uri("/containsCloud").body(Mono.just("this is a cloud"), String.class).exchange()
                .expectStatus().isOk().expectBody(String.class).isEqualTo("true");
    }

    @Test
    void doesNotContainsCloud() {
        client.post().uri("/containsCloud").body(Mono.just("this is a function"), String.class).exchange()
                .expectStatus().isOk().expectBody(String.class).isEqualTo("false");
    }

}
4. Deploy to AWS Lambda
Now that we have create the function, it is time to deploy the function to AWS Lambda. We will use the official documentation and the sample app in order to make the changes to our own application. The sample app is in traditional form, so let’s see whether this also works for the functional style implementation.
We need to make the following changes to the pom file:
- Add the dependencies
spring-cloud-function-adapter-aws,aws-lambda-java-eventsandaws-lambda-java-core. - Set the scope of dependency
spring-cloud-starter-function-webfluxtotest. We do not need this dependency for deployment to AWS Lambda, but we do need it for our unit tests. - Disable the deploy phase in the
maven-deploy-plugin. - Add a dependency on
spring-boot-thin-layoutfor thespring-boot-maven-plugin. More information about the thin layout can be found here. Basically, it will create a small and executable jar file. - Add the
maven-shade-plugin. The Maven Shade Plugin will by default replace the project’s main artifact with the shaded artifact. If both the original and the shaded artifact should be installed/deployed to the repository, one can configure the plugin to attach the shaded artifact as a secondary artifact by means of the configuration propertiesshadedArtifactAttachedandshadedClassifierName. The flagcreateDependencyReducedPomis by default true and will generate a simplified version of thepom. But we do not need this, so we set it tofalse. A complete overview of the parameters can be found here.
The changes to the pom are (code is present in the master branch):
<dependencies>
    <dependency>
        <groupId>org.springframework.cloud</groupId>
        <artifactId>spring-cloud-function-adapter-aws</artifactId>
    </dependency>
    ...
    <dependency>
        <groupId>org.springframework.cloud</groupId>
        <artifactId>spring-cloud-starter-function-webflux</artifactId>
        <version>3.0.10.RELEASE</version>
        <scope>test</scope>
    </dependency>
    <dependency>
        <groupId>com.amazonaws</groupId>
        <artifactId>aws-lambda-java-events</artifactId>
        <version>2.0.2</version>
    </dependency>
    <dependency>
        <groupId>com.amazonaws</groupId>
        <artifactId>aws-lambda-java-core</artifactId>
        <version>1.1.0</version>
        <scope>provided</scope>
    </dependency>
    ...
</dependencies>
...
<build>
    <plugins>
        <plugin>
            <groupId>org.apache.maven.plugins</groupId>
            <artifactId>maven-deploy-plugin</artifactId>
            <configuration>
                <skip>true</skip>
            </configuration>
        </plugin>
        <plugin>
            <groupId>org.springframework.boot</groupId>
            <artifactId>spring-boot-maven-plugin</artifactId>
            <dependencies>
                <dependency>
                    <groupId>org.springframework.boot.experimental</groupId>
                    <artifactId>spring-boot-thin-layout</artifactId>
                    <version>1.0.17.RELEASE</version>
                </dependency>
            </dependencies>
        </plugin>
        <plugin>
            <groupId>org.apache.maven.plugins</groupId>
            <artifactId>maven-shade-plugin</artifactId>
            <version>3.2.2</version>
            <configuration>
                <createDependencyReducedPom>false</createDependencyReducedPom>
                <shadedArtifactAttached>true</shadedArtifactAttached>
                <shadedClassifierName>aws</shadedClassifierName>
            </configuration>
        </plugin>
    </plugins>
</build>
Create the jar files:
$ mvn clean package
This will create the two jars. Some warnings are raised, but we will ignore them.
maven-shade-plugin has detected that some class files are
present in two or more JARs. When this happens, only one
single version of the class is copied to the uber jar.
Usually this is not harmful and you can skip these warnings,
otherwise try to manually exclude artifacts based on
mvn dependency:tree -Ddetail=true and the above output.
We will create the function in AWS by means of the AWS Management Console. It is also possible to do so by means of the AWS CLI.
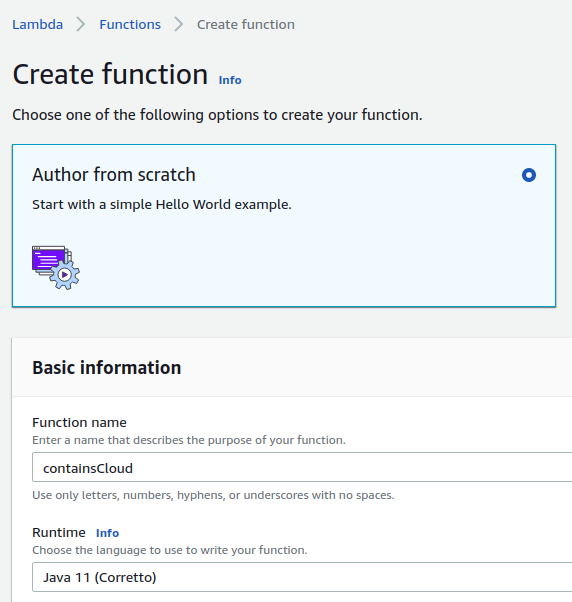
Login to the AWS Management Console and search for the AWS Lambda service.

In the AWS Lambda page, click the Create function button.

Give the function a name and select Java 11 (Corretto) as runtime and click the Create function button at the bottom right corner.
Navigate to the Function code section and choose Upload a .zip or .jar file from the Actions menu.

Select the aws jar file located in your target directory and click the Save button.

Navigate to the Basic settings section and click the Edit button.

Enter org.springframework.cloud.function.adapter.aws.FunctionInvoker::handleRequest as Handler and click the Save button.

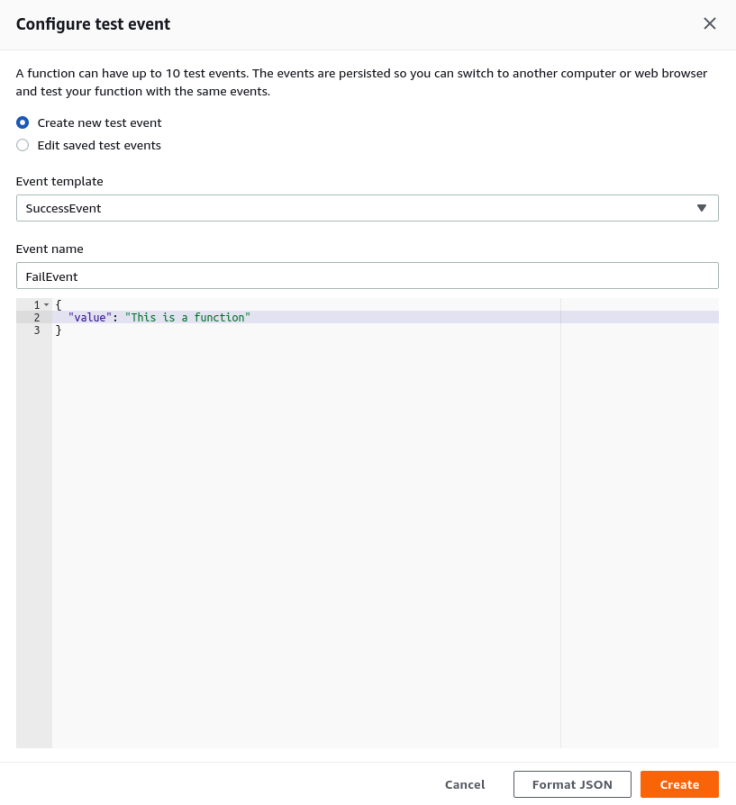
In order to test the function, we will create two test events. Go to the right top corner and select Configure test events.

Create a SuccessEvent and a FailEvent.

When running the Test SuccessEvent, the following error occurs:
{
  "errorMessage": "No qualifying bean of type 'org.springframework.cloud.function.context.FunctionCatalog' available",
  "errorType": "org.springframework.beans.factory.NoSuchBeanDefinitionException"
}
Remember that we used the functional style and the samples we found were all with the traditional style. So, let’s return to the bean definition style again (branch feature/aws-function-bean-defintion) and run:
$ mvn clean package -DskipTests
Deploy the aws jar to AWS Lambda and invoke the SuccessEvent again. The result is now successful.

Do the same with FailEvent and this is also successful.

According to a Spring blog, the functional style should work without any problem, but it gives us an error.
We could not find out what caused the problem and therefore posted a question on StackOverflow.
At the end, do not forget to delete your function again in order to minimize any costs.
5. Conclusion
Creating a function with Spring Cloud Function is fairly easy. It is a great advantage that you can use your experience with Spring Boot in order to develop serverless functions. Deploying the function to AWS Lambda is also fairly easy but we encountered a problem when using the functional style for developing the function. The traditional style worked out-of-the-box.
Discover more from My Developer Planet
Subscribe to get the latest posts sent to your email.
functional style works perfectly with handler org.springframework.cloud.function.adapter.aws.SpringBootStreamHandler
Wonder how is the response time for AWS Lambda Spring Cloud Function
Check this out, response times are improved lately: https://catalog.workshops.aws/java-on-aws-lambda/en-US