
The 19th of September 2023, Java 21 was released. Time to take a closer look at the changes since the last LTS release, which is Java 17. In this blog, some of the changes between Java 17 and Java 21 are highlighted, mainly by means of examples. Enjoy!
1. Introduction
First of all, the short introduction is not entirely correct because Java 21 is mentioned in one sentence with being an LTS release. An elaborate explanation is given in this blog of Nicolai Parlog. In short, Java 21 is a set of specifications defining the behaviour of the Java language, the API, the virtual machine, etc. A reference implementation of Java 21 is implemented by OpenJDK. Updates to the reference implementation are made in this OpenJDK repository. After the release, a fork is created jdk21u. This jdk21u fork is maintained and will receive updates for a longer time than the regular 6-month cadence. Even with jdk21u, there is no guarantee that fixes are made during a longer time period. This is where the different Vendor implementations make a difference. They build their own JDKs and make them freely available, often with commercial support. So, it is better to say “JDK21 is a version, for which many vendors offer support”.
What has changed between Java 17 and Java 21? A complete list of the JEPs (Java Enhancement Proposals) can be found at the OpenJDK website. Here you can read the nitty gritty details of each JEP. For a complete list of what has changed per release since Java 17, the Oracle release notes give a good overview.
In the next sections, some of the changes are explained by example, but it is mainly up to you to experiment with these new features in order to get acquainted with them. Do note that no preview or incubator JEPs are considered here. The sources used in this post are available at GitHub.
Check out an earlier blog if you want to know what has changed between Java 11 and Java 17.
Last thing to mention in this introduction, is the availability of a Java playground, where you can experiment with Java from within your browser.
2. Prerequisites
Prerequisites for this blog are:
- You must have a JDK21 installed;
- You need some basic Java knowledge.
3. JEP444: Virtual Threads
Let’s start with the most important new feature in JDK21: virtual threads. Virtual threads are lightweight threads that dramatically reduce the effort of writing, maintaining, and observing high-throughput concurrent applications. Up till now, threads were implemented as wrappers around Operating System (OS) threads. OS threads are costly and if you send an http request to another server, you will block this thread until you have received the answer of the server. The processing part (creating the request and processing the answer) is just a small portion of the entire time the thread was blocked. Sending the request and waiting for the answer takes up much more time than the processing part. A way to circumvent this, is to use asynchronous style. Disadvantage of this approach is the more complex implementation. This is where virtual threads come to the rescue. You are able to keep the implementation simple like you did before and still have the scalability of the asynchronous style.
The Java application PlatformThreads.java demonstrates what happens when creating 1.000, 10.000, 100.000 and 1.000.000 threads concurrently. The threads only wait for one second. Dependent on your machine, you will get different results because the threads are bound to the OS threads.
public class PlatformThreads {

    public static void main(String[] args) {
        testPlatformThreads(1000);
        testPlatformThreads(10_000);
        testPlatformThreads(100_000);
        testPlatformThreads(1_000_000);
    }

    private static void testPlatformThreads(int maximum) {
        long time = System.currentTimeMillis();

        try (var executor = Executors.newCachedThreadPool()) {
            IntStream.range(0, maximum).forEach(i -> {
                executor.submit(() -> {
                    Thread.sleep(Duration.ofSeconds(1));
                    return i;
                });
            });
        }

        time = System.currentTimeMillis() - time;
        System.out.println("Number of threads = " + maximum + ", Duration(ms) = " + time);
    }

}
The output of running this application is the following:
Number of threads = 1000, Duration(ms) = 1094
Number of threads = 10000, Duration(ms) = 1625
Number of threads = 100000, Duration(ms) = 5292
[21,945s][warning][os,thread] Attempt to protect stack guard pages failed (0x00007f8525d00000-0x00007f8525d04000).
#
# A fatal error has been detected by the Java Runtime Environment:
# Native memory allocation (mprotect) failed to protect 16384 bytes for memory to guard stack pages
# An error report file with more information is saved as:
# /home/<user_dir>/MyJava21Planet/hs_err_pid8277.log
[21,945s][warning][os,thread] Attempt to protect stack guard pages failed (0x00007f8525c00000-0x00007f8525c04000).
[thread 82370 also had an error]
[thread 82371 also had an error]
[21,946s][warning][os,thread] Failed to start thread "Unknown thread" - pthread_create failed (EAGAIN) for attributes: stacksize: 1024k, guardsize: 0k, detached.
[21,946s][warning][os,thread] Failed to start the native thread for java.lang.Thread "pool-4-thread-32577"
...
What do you see here? The application takes about 1s for 1.000 threads, 1.6s for 10.000 threads, 5.3s for 100.000 threads and it crashes with 1.000.000 threads. The boundary for the maximum number of OS threads on my machine lies somewhere between 100.000 and 1.000.000 threads.
Change the application by replacing the Executors.newCachedThreadPool with the new Executors.newVirtualThreadPerTaskExecutor (VirtualThreads.java).
try (var executor = Executors.newVirtualThreadPerTaskExecutor()) {
            IntStream.range(0, maximum).forEach(i -> {
                executor.submit(() -> {
                    Thread.sleep(Duration.ofSeconds(1));
                    return i;
                });
            });
        }
Run the application again. The output is the following:
Number of threads = 1000, Duration(ms) = 1020
Number of threads = 10000, Duration(ms) = 1056
Number of threads = 100000, Duration(ms) = 1106
Number of threads = 1000000, Duration(ms) = 1806
Number of threads = 10000000, Duration(ms) = 22010
The application takes about 1s for 1.000 threads (similar to the OS threads), 1s for 10.000 threads (better than OS threads), 1.1s for 100.000 threads (also better), 1.8s for 1.000.000 (does not crash) and even 10.000.000 threads are no problem, taking about 22s in order to execute. This is quite amazing and incredible, isn’t it?
4. JEP431: Sequenced Collections
Sequenced Collections fill the lack of a collection type that represents a sequence of elements with a defined encounter order. Besides that, a uniform set of operations were absent that apply such collections. There have been quite some complaints from the community about this topic and this is now solved by the introduction of some new collection interfaces. The overview is available in the following image which is based on the overview as created by Stuart Marks.

Besides the new introduced interfaces, some unmodifiable wrappers are available now.
Collections.unmodifiableSequencedCollection(sequencedCollection)
Collections.unmodifiableSequencedSet(sequencedSet)
Collections.unmodifiableSequencedMap(sequencedMap)
The next sections will show these new interfaces based on the application SequencedCollections.java.
4.1 SequencedCollection
A sequenced collection is a Collection whose elements have a predefined encounter order. The new interface SequencedCollection is:
interface SequencedCollection<E> extends Collection<E> {
    // new method
    SequencedCollection<E> reversed();
    // methods promoted from Deque
    void addFirst(E);
    void addLast(E);
    E getFirst();
    E getLast();
    E removeFirst();
    E removeLast();
}
In the following example, a list is created and reversed. The first and last item are retrieved and a new first and last item are added.
private static void sequencedCollection() {
    List<String> sc = Stream.of("Alpha", "Bravo", "Charlie", "Delta").collect(Collectors.toCollection(ArrayList::new));
    System.out.println("Initial list: " + sc);
    System.out.println("Reversed list: " + sc.reversed());
    System.out.println("First item: " + sc.getFirst());
    System.out.println("Last item: " + sc.getLast());
    sc.addFirst("Before Alpha");
    sc.addLast("After Delta");
    System.out.println("Added new first and last item: " + sc);
}
The output is:
Initial list: [Alpha, Bravo, Charlie, Delta]
Reversed list: [Delta, Charlie, Bravo, Alpha]
First item: Alpha
Last item: Delta
Added new first and last item: [Before Alpha, Alpha, Bravo, Charlie, Delta, After Delta]
As you can see, no real surprises here, it just works.
4.2 SequencedSet
A sequenced set is a Set that is a SequencedCollection that contains no duplicate elements. The new interface is:
interface SequencedSet<E> extends Set<E>, SequencedCollection<E> {
    SequencedSet<E> reversed();    // covariant override
}
In the following example, a SortedSet is created and reversed. The first and last item are retrieved and it is tried to add a new first and last item.
private static void sequencedSet() {
    SortedSet<String> sortedSet = new TreeSet<>(Set.of("Charlie", "Alpha", "Delta", "Bravo"));
    System.out.println("Initial list: " + sortedSet);
    System.out.println("Reversed list: " + sortedSet.reversed());
    System.out.println("First item: " + sortedSet.getFirst());
    System.out.println("Last item: " + sortedSet.getLast());
    try {
        sortedSet.addFirst("Before Alpha");
    } catch (UnsupportedOperationException uoe) {
        System.out.println("addFirst is not supported");
    }
    try {
        sortedSet.addLast("After Delta");
    } catch (UnsupportedOperationException uoe) {
        System.out.println("addLast is not supported");
    }
}
The output is:
Initial list: [Alpha, Bravo, Charlie, Delta]
Reversed list: [Delta, Charlie, Bravo, Alpha]
First item: Alpha
Last item: Delta
addFirst is not supported
addLast is not supported
The only difference with a SequencedCollection is that the elements are sorted alphabetically in the initial list and that the addFirst and addLast methods are not supported. This is obvious because you cannot guarantee that the first element will remain the first element when added to the list (it will be sorted again anyway).
4.3 SequencedMap
A sequenced map is a Map whose entries have a defined encounter order. The new interface is:
interface SequencedMap<K,V> extends Map<K,V> {
    // new methods
    SequencedMap<K,V> reversed();
    SequencedSet<K> sequencedKeySet();
    SequencedCollection<V> sequencedValues();
    SequencedSet<Entry<K,V>> sequencedEntrySet();
    V putFirst(K, V);
    V putLast(K, V);
    // methods promoted from NavigableMap
    Entry<K, V> firstEntry();
    Entry<K, V> lastEntry();
    Entry<K, V> pollFirstEntry();
    Entry<K, V> pollLastEntry();
}
In the following example, a LinkedHashMap is created and some elements are added and the list is reversed. The first and last elements are retrieved and new first and last items are added.
private static void sequencedMap() {
    LinkedHashMap<Integer,String> hm = new LinkedHashMap<Integer,String>();
    hm.put(1, "Alpha");
    hm.put(2, "Bravo");
    hm.put(3, "Charlie");
    hm.put(4, "Delta");
    System.out.println("== Initial List ==");
    printMap(hm);
    System.out.println("== Reversed List ==");
    printMap(hm.reversed());
    System.out.println("First item: " + hm.firstEntry());
    System.out.println("Last item: " + hm.lastEntry());
    System.out.println(" == Added new first and last item ==");
    hm.putFirst(5, "Before Alpha");
    hm.putLast(3, "After Delta");
    printMap(hm);
}
The output is:
== Initial List ==
1 Alpha
2 Bravo
3 Charlie
4 Delta
== Reversed List ==
4 Delta
3 Charlie
2 Bravo
1 Alpha
First item: 1=Alpha
Last item: 4=Delta
 == Added new first and last item ==
5 Before Alpha
1 Alpha
2 Bravo
4 Delta
3 After Delta
Also here no surprises.
5. JEP440: Record Patterns
Record patterns enhance the java programming language in order to deconstruct record values. This will make it easier to navigate into the data. Let’s see how this works with application RecordPatterns.java.
Assume the following GrapeRecord which consists out of a color and a number of pits.
record GrapeRecord(Color color, Integer nbrOfPits) {}
When you need to access the number of pits, you had to implicitely cast the GrapeRecord and you were able to access the nbrOfPits member using the grape variable.
private static void singleRecordPatternOldStyle() {
    Object o = new GrapeRecord(Color.BLUE, 2);
    if (o instanceof GrapeRecord grape) {
        System.out.println("This grape has " + grape.nbrOfPits() + " pits.");
    }
}
With Record Patterns, you can add the record members as part of the instanceof check and access them directly.
private static void singleRecordPattern() {
    Object o = new GrapeRecord(Color.BLUE, 2);
    if (o instanceof GrapeRecord(Color color, Integer nbrOfPits)) {
        System.out.println("This grape has " + nbrOfPits + " pits.");
    }
}
Introduce a record SpecialGrapeRecord which consists out of a record GrapeRecord and a boolean.
record SpecialGrapeRecord(GrapeRecord grape, boolean special) {}
You have created a nested record. Record Patterns also support nested records as can be seen in the following example:
private static void nestedRecordPattern() {
    Object o = new SpecialGrapeRecord(new GrapeRecord(Color.BLUE, 2), true);
    if (o instanceof SpecialGrapeRecord(GrapeRecord grape, boolean special)) {
        System.out.println("This grape has " + grape.nbrOfPits() + " pits.");
    }
    if (o instanceof SpecialGrapeRecord(GrapeRecord(Color color, Integer nbrOfPits), boolean special)) {
        System.out.println("This grape has " + nbrOfPits + " pits.");
    }
}
6. JEP441: Pattern Matching for Switch
Pattern matching for instanceof has been introduced with Java 17. Pattern matching for switch expressions will allow to test expressions against a number of patterns. This leads to several new and interesting possibilities as is demonstrated in application PatternMatchingSwitch.java.
6.1 Pattern Matching Switch
When you want to verify whether an object is an instance of a particular type, you needed to write something like the following:
private static void oldStylePatternMatching(Object obj) {
    if (obj instanceof Integer i) {
        System.out.println("Object is an integer:" + i);
    } else if (obj instanceof String s) {
        System.out.println("Object is a string:" + s);
    } else if (obj instanceof FruitType f) {
        System.out.println("Object is a fruit: " + f);
    } else {
        System.out.println("Object is not recognized");
    }
}
This is quite verbose and the reason is that you cannot test whether the value is of a particular type in a switch expression. With the introduction of pattern matching for switch, you can refactor the code above to the following, less verbose code:
private static void patternMatchingSwitch(Object obj) {
    switch(obj) {
        case Integer i   -> System.out.println("Object is an integer:" + i);
        case String s    -> System.out.println("Object is a string:" + s);
        case FruitType f -> System.out.println("Object is a fruit: " + f);
        default -> System.out.println("Object is not recognized");
    }
}
6.2 Switches and Null
When the object argument in the previous example happens to be null, a NullPointerException will be thrown. Therefore, you need to check for null values before evaluating the switch expression. The following code uses pattern matching for switch, but if obj is null, a NullPointerException is thrown.
private static void oldStyleSwitchNull(Object obj) {
    try {
        switch (obj) {
            case Integer i -> System.out.println("Object is an integer:" + i);
            case String s -> System.out.println("Object is a string:" + s);
            case FruitType f -> System.out.println("Object is a fruit: " + f);
            default -> System.out.println("Object is not recognized");
        }
    } catch (NullPointerException npe) {
        System.out.println("NullPointerException thrown");
    }
}
However, now it is possible to test against null and determine in your switch what to do when the value happens to be null.
private static void switchNull(Object obj) {
    switch (obj) {
        case Integer i -> System.out.println("Object is an integer:" + i);
        case String s -> System.out.println("Object is a string:" + s);
        case FruitType f -> System.out.println("Object is a fruit: " + f);
        case null -> System.out.println("Object is null");
        default -> System.out.println("Object is not recognized");
    }
}
6.3 Case Refinement
What if you need to add extra checks based on a specific FruitType in the previous example? This would lead to extra if-statements in order to determine what to do.
private static void inefficientCaseRefinement(Object obj) {
    switch (obj) {
        case String s -> System.out.println("Object is a string:" + s);
        case FruitType f -> {
            if (f == FruitType.APPLE) {
                System.out.println("Object is an apple");
            }
            if (f == FruitType.AVOCADO) {
                System.out.println("Object is an avocado");
            }
            if (f == FruitType.PEAR) {
                System.out.println("Object is a pear");
            }
            if (f == FruitType.ORANGE) {
                System.out.println("Object is an orange");
            }
        }
        case null -> System.out.println("Object is null");
        default -> System.out.println("Object is not recognized");
    }
}
This type of problem is solved by allowing when-clauses in switch blocks to specify guards to pattern case labels. The case label is called a guarded case label and the boolean expression is called the guard. The above code becomes the following code, which is much more readable.
private static void caseRefinement(Object obj) {
    switch (obj) {
        case String s -> System.out.println("Object is a string:" + s);
        case FruitType f when (f == FruitType.APPLE) -> {
            System.out.println("Object is an apple");
        }
        case FruitType f when (f == FruitType.AVOCADO) -> {
            System.out.println("Object is an avocado");
        }
        case FruitType f when (f == FruitType.PEAR) -> {
            System.out.println("Object is a pear");
        }
        case FruitType f when (f == FruitType.ORANGE) -> {
            System.out.println("Object is an orange");
        }
        case null -> System.out.println("Object is null");
        default -> System.out.println("Object is not recognized");
    }
}
6.4 Enum Constants
Enum types can be used in switch expressions, but the evaluation is limited to the enum constants of the specific type. What if you want to evaluate based on multiple enum constants?
Introduce a new enum CarType.
public enum CarType { SUV, CABRIO, EV
}
Now that it is possible to use a case refinement, you could write something like the following.
private static void inefficientEnumConstants(Object obj) {
    switch (obj) {
        case String s -> System.out.println("Object is a string:" + s);
        case FruitType f when (f == FruitType.APPLE) -> System.out.println("Object is an apple");
        case FruitType f when (f == FruitType.AVOCADO) -> System.out.println("Object is an avocado");
        case FruitType f when (f == FruitType.PEAR) -> System.out.println("Object is a pear");
        case FruitType f when (f == FruitType.ORANGE) -> System.out.println("Object is an orange");
        case CarType c when (c == CarType.CABRIO) -> System.out.println("Object is a cabrio");
        case null -> System.out.println("Object is null");
        default -> System.out.println("Object is not recognized");
    }
}
This code would be more readable if you would have a separate case for every enum constant instead of having a lots of guarded patterns. This turns the above code into the following, much more readable code.
private static void enumConstants(Object obj) {
    switch (obj) {
        case String s -> System.out.println("Object is a string:" + s);
        case FruitType.APPLE -> System.out.println("Object is an apple");
        case FruitType.AVOCADO -> System.out.println("Object is an avocado");
        case FruitType.PEAR -> System.out.println("Object is a pear");
        case FruitType.ORANGE -> System.out.println("Object is an orange");
        case CarType.CABRIO -> System.out.println("Object is a cabrio");
        case null -> System.out.println("Object is null");
        default -> System.out.println("Object is not recognized");
    }
}
7. JEP413: Code Snippets
Code snippets allow you to simplify the inclusion of example source code in API documentation. Code snippets are now often added by means of the <pre> HTML tag. See application Snippets.java for the complete source code.
/**
 * this is an example in Java 17
 * <pre>{@code
 *    if (success) {
 *        System.out.println("This is a success!");
 *    } else {
 *        System.out.println("This is a failure");
 *    }
 * }
 * </pre>
 * @param success
 */
public void example1(boolean success) {
    if (success) {
        System.out.println("This is a success!");
    } else {
        System.out.println("This is a failure");
    }
}
Generate the javadoc:
$ javadoc src/com/mydeveloperplanet/myjava21planet/Snippets.java -d javadoc
In the root of the repository, a directory javadoc is created. Open the index.html file with your favourite browser and click the snippets URL. The above code has the following javadoc.

There are some shortcomings using this approach:
- no source code validation;
- no way to add comments because the fragment is already located in a comment block;
- no code syntax highlighting;
- etc.
7.1 Inline Snippets
In order to overcome these shortcomings, a new @snippet tag is introduced. The code above can be rewritten as follows.
/**
 * this is an example for inline snippets
 * {@snippet :
 *    if (success) {
 *        System.out.println("This is a success!");
 *    } else {
 *        System.out.println("This is a failure");
 *    }
 * }
 *
 * @param success
 */
public void example2(boolean success) {
    if (success) {
        System.out.println("This is a success!");
    } else {
        System.out.println("This is a failure");
    }
}
The generated javadoc is the following.
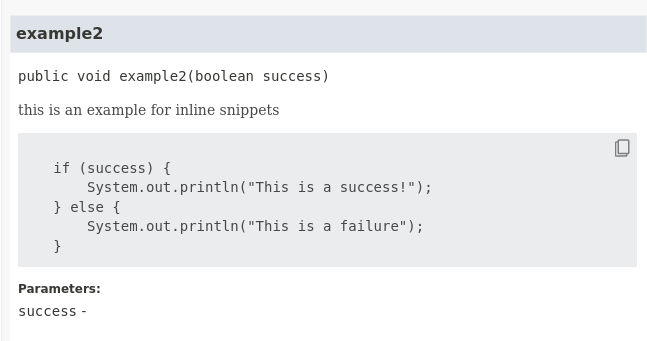
You notice here that the code snippet is visible marked as source code and a copy source code icon is added. As an extra test, you can remove in the javadoc of methods example1 and example2 a semi-colon, introducing a compiler error. In example1, the IDE just accepts this compiler error. However, in example2, the IDE will prompt you about this compiler error.
7.2 External Snippets
An interesting feature is to move your code snippets to an external file. Create in package com.mydeveloperplanet.myjava21planet a directory snippet-files.
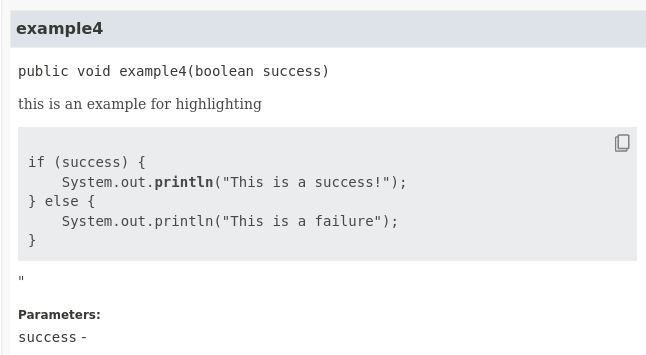
Create a class SnippetsExternal in this directory and mark the code snippets by means of an @start tag and an @end tag. With the region parameter, you can give the code snippet a name to refer to. The example4 method also contains the @highlight tag which allows you highlight certain elements in the code. Many more formatting and highlighting options are available, it is too much to cover them all.
public class SnippetsExternal {

    public void example3(boolean success) {
        // @start region=example3
        if (success) {
            System.out.println("This is a success!");
        } else {
            System.out.println("This is a failure");
        }
        // @end
    }

    public void example4(boolean success) {
        // @start region=example4
        if (success) {
            System.out.println("This is a success!"); // @highlight substring="println"
        } else {
            System.out.println("This is a failure");
        }
        // @end
    }

}
In your code, you refer to the SnippetsExternal file and the region you want to include in your javadoc.
/**
 * this is an example for external snippets
 * {@snippet file="SnippetsExternal.java" region="example3" }"
 *
 * @param success
 */
public void example3(boolean success) {
    if (success) {
        System.out.println("This is a success!");
    } else {
        System.out.println("This is a failure");
    }
}

/**
 * this is an example for highlighting
 * {@snippet file="SnippetsExternal.java" region="example4" }"
 *
 * @param success
 */
public void example4(boolean success) {
    if (success) {
        System.out.println("This is a success!");
    } else {
        System.out.println("This is a failure");
    }
}
When you generate the javadoc as before, you will notice in the output that the javadoc tool cannot find the SnippetsExternal file.
src/com/mydeveloperplanet/myjava21planet/Snippets.java:48: error: file not found on source path or snippet path: SnippetsExternal.java
     * {@snippet file="SnippetsExternal.java" region="example3" }"
                 ^
src/com/mydeveloperplanet/myjava21planet/Snippets.java:62: error: file not found on source path or snippet path: SnippetsExternal.java
     * {@snippet file="SnippetsExternal.java" region="example4" }"
You need to add the path to the snippet files by means of the --snippet-path argument.
$ javadoc src/com/mydeveloperplanet/myjava21planet/Snippets.java -d javadoc --snippet-path=./src/com/mydeveloperplanet/myjava21planet/snippet-files
The javadoc for method example3 contains the defined snippet.

The javadoc for method example4 contains the highlighted section.
8. JEP408: Simple Web Server
Simple Web Server is a minimal HTTP server for serving a single directory hierarchy. Goal is to provide a web server for computer science students for testing or prototyping purposes.
Create in the root of the repository a httpserver directory, containing a simple index.html file.
Welcome to Simple Web Server
You can start the web server programmatically as follows (see SimpleWebServer.java). The path to the directory must refer to the absolute path of the directory.
private static void startFileServer() {
    var server = SimpleFileServer.createFileServer(new InetSocketAddress(8080),
            Path.of("/<absolute path>/MyJava21Planet/httpserver"),
            SimpleFileServer.OutputLevel.VERBOSE);
    server.start();
}
Verify the output.
$ curl http://localhost:8080
Welcome to Simple Web Server
You can change the contents of the index.html file on the fly and it will serve the new contents immediately after a refresh of the page.
It is also possible to create a custom HttpHandler in order to intercept the response and change it.
class MyHttpHandler implements com.sun.net.httpserver.HttpHandler {

    @Override
    public void handle(HttpExchange exchange) throws IOException {
        if ("GET".equals(exchange.getRequestMethod())) {
            OutputStream outputStream = exchange.getResponseBody();
            String response = "It works!";
            exchange.sendResponseHeaders(200, response.length());
            outputStream.write(response.getBytes());
            outputStream.flush();
            outputStream.close();
        }
    }
}
Start the web server on a different port and add a context path and the HttpHandler.
private static void customFileServerHandler() {
    try {
        var server = HttpServer.create(new InetSocketAddress(8081), 0);
        server.createContext("/custom", new MyHttpHandler());
        server.start();
    } catch (IOException ioe) {
        System.out.println("IOException occured");
    }
}
Run this application and verify the output.
$ curl http://localhost:8081/custom
It works!
9. Conclusion
In this blog, you took a quick look at some features added since the last LTS release Java 17. It is now up to you to start thinking about your migration plan to Java 21 and a way to learn more about these new features and how you can apply them into your daily coding habits. Tip: IntelliJ will help you with that!
Discover more from My Developer Planet
Subscribe to get the latest posts sent to your email.