
Are you using the C4 model to create your architecture diagrams? Then Structurizr might be a good option for you to consider. With Structurizr, you can create and maintain your diagrams as code. Let’s take a closer look at it in this blog!
1. Introduction
The C4 model helps you with visualizing software architecture. We all know the whiteboard diagrams cluttered with boxes and connectors. The C4 model approach helps you with visualizing software architecture in a more structured way. A good explanation is given on the C4 model website, so if you do not know what it is, it is worth reading it first.
Next question is which tool you use to create the diagrams. You can use Visio, draw.io, PlantUML, even PowerPoint, or whatever tool you normally use for creating diagrams. However, these tools do not check whether naming, relations, etc. are consistently used in the different diagrams. Besides that, it might be difficult to review new versions of diagrams because it is not clear which changes are made.
In order to solve these problems, Simon Brown, the author of the C4 model, created Structurizr. Structurizr allows you to create diagrams as code. Based on the code, Structurizr visualizes the diagrams for you and allow you to interact with the visualization. Because the diagrams are maintained in code, you can add them to your version control system (git) and changes in the diagrams are tracked and can be easily reviewed.
In the remaining part of this blog, you will explore some of the features of Structurizr. You will only use two diagram types of the C4 model (the most commonly used ones):
- System Context Diagram: your application as a black-box indicating the users of your application;
- Container Diagram: an overview of your software architecture.
Sources used in this blog can be found at GitHub.
2. Prerequisites
Prerequisites for this blog are:
- Basic knowledge of the C4 model;
- Basic knowledge of Docker;
- Linux is used, if you are using a different Operating System, you will need to adjust the commands accordingly.
3. Installation
There are different installation options for Structurizr. In this blog, you will make use of Structurizr Lite, which is an easy installation using docker which supports one workspace.
Create in the root of the repository a data directory. This directory will be mapped as a volume in the docker container.
Execute the following commands from within the root of the repository.
$ docker pull structurizr/lite
$ docker run -it --rm -p 8080:8080 -v ./data:/usr/local/structurizr structurizr/lite
Navigate in your browser to http://localhost:8080 and the Structurizr webpage is shown.

In the data directory, you notice that some data is added. When you take a closer look at it, you notice that all files have the root ownership. This is not very convenient, because when you want to edit the files, you have to do so as root.
$ ls -la
...
drwxr-xr-x 1 root      root           22 feb 18 12:04 .structurizr/
-rw-r--r-- 1 root      root          316 feb 18 12:03 workspace.dsl
-rw-r--r-- 1 root      root         2218 feb 18 12:04 workspace.json
Stop the container with CTRL+C and remove the contents of the data directory.
You will start the container with the same user you are using on your host machine. With the id command, you can retrieve your uid and gid. It is important that you use the same uid and gid inside the container in order that files can be edited easily inside and outside the container.
Replace in the following command <uid> and <gid> with your uid and gid and start the docker container again.
$ docker run -it --rm -p 8080:8080 -u <uid>:<gid> -v ./data:/usr/local/structurizr structurizr/lite
When you check the ownership of the files again, you will notice that the directory and files are now owned by your host user.
Navigate again in the browser to Structurizr and enable Auto canvas size and Auto-layout. This will create a more beautiful diagram.

4. Initial DSL
First, let’s take a closer look at the initial DSL which has been created. The complete DSL reference can be found here.
The initial DSL is the following:
workspace {

    model {
        user = person "User"
        softwareSystem = softwareSystem "Software System"

        user -> softwareSystem "Uses"
    }

    views {
        systemContext softwareSystem "Diagram1" {
            include *
        }
    }

    configuration {
        scope softwaresystem
    }

}
The following sections can be viewed:
- model: The model contains the actors and the software system. If you need to reference these in the DSL, e.g. in relations, you assign them to a variable. The variables user and softwareSystem are used here. The model also contains the relations. One relation from user to softwareSystem is created.
- views: In order to visualize the model, you need to create views. In this initial DSL a view for the System Context Diagram is created. With the include keyword, you can include all or a part of the model.
- configuration: This section will not be covered in this blog.
5. Basic System Context DSL
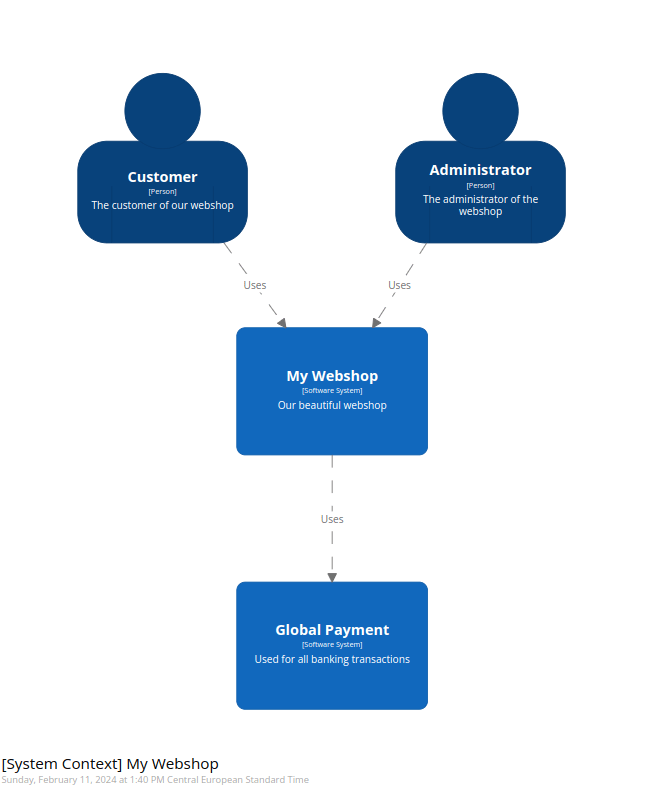
Now it is time to create a System Context Diagram for your application. The application is a webshop with two types of users, a customer and an administrator. The webshop makes use of a global payment system which handles bank transactions.
The DSL is the following:
workspace {

    model {
        customer = person "Customer" "The customer of our webshop"
        administrator = person "Administrator" "The administrator of the webshop"
        globalPayment = softwareSystem "Global Payment" "Used for all banking transactions"

        myWebshop = softwareSystem "My Webshop" "Our beautiful webshop"

        customer -> myWebshop "Uses"
        administrator -> myWebshop "Uses"
        myWebshop -> globalPayment "Uses"
    }

    views {
        systemContext myWebshop "MyWebshopSystemContextView" {
            include *
            autolayout
        }
    }

}
Some things to notice here:
- Relations have the following format:
identifier -> identifier description technology
The identifiers must correspond to a variable defined above the relations. - Views have the following format:
systemContext softwareSystem key
The softwareSystem must correspond to an identifier defined in the model. The key can be chosen freely. - The autolayout option can be added to the view, in order that it is enabled by default for this view.
- A problem I encountered is the following:
Only one person was shown in the view, the last one defined. I managed to solve this by commenting the entire view section. A default view is used this way. With this default view, all persons were shown. After this, I enabled the view section again, and now all persons were shown.
The System Context Diagram is shown as follows.

You can also apply themes to the views, which will enhance your diagram.
views {
    systemContext myWebshop "MyWebshopSystemContextView" {
        include *
        autolayout
    }
    theme default
}
The System Context Diagram becomes the following. This already looks more like a C4 model System Context Diagram.
6. Basic Container DSL
Time to create a diagram for the software architecture, the Container Diagram. Assume that you need a frontend for both users, a common backend and of course a database.
The DSL becomes the following:
workspace {

    model {
        customer = person "Customer" "The customer of our webshop"
        administrator = person "Administrator" "The administrator of the webshop"
        globalPayment = softwareSystem "Global Payment" "Used for all banking transactions"

        myWebshop = softwareSystem "My Webshop" "Our beautiful webshop" {
            customerFrontend = container customerFrontend "The frontend for the customer"
            administratorFrontend = container administratorFrontend "The frontend for the administrator"
            webshopBackend = container webshopBackend "The webshop backend"
            webshopDatabase = container webshopDatabase "The webshop database"
        }

        // system context relationships
        customer -> myWebshop "Uses"
        administrator -> myWebshop "Uses"
        myWebshop -> globalPayment "Uses"

        // software system relationships
        customer -> customerFrontend "Uses" "https"
        administrator -> administratorFrontend "Uses" "https"
        customerFrontend -> webshopBackend "Uses" "http"
        administratorFrontend -> webshopBackend "Uses" "http"
        webshopBackend -> webshopDatabase "Uses" "ODBC"
        webshopBackend -> globalPayment "Uses" "https"

    }

    views {
        systemContext myWebshop "MyWebshopSystemContextView" {
            include *
            autolayout
        }
        container myWebshop "MyWebshopSoftwareSystemView" {
            include *
            autolayout
        }
        theme default
    }

}
What has been added to the DSL?
- The application myWebshop in the model has been extended with the containers defining the architecture.
- In the model, the relations are defined between the containers. Note that this time, also the used technology is added to the relations.
- A container view is added to the views.
The container view is represented as follows.

The fun part is, that when you navigate to the System Context Diagram, you can double-click the myWebshop software system and it will show you the Container Diagram. Awesome!
7. Styling
In the Container Diagram, the database is represented as a rounded box. Normally, a database is represented as a cylinder. Is it possible to adjust this? Yes, you can. This can be done by means of styles. The list of possible shapes can be found here.
A style can be applied to an element by using a tag. First, add in the views section a style for an element with tag Database. You apply a shape Cylinder to this element.
views {
    ...
    styles {
        element "Database" {
            shape Cylinder
        }
    }
}
Now you need to add a tag to the corresponding container. When you define a container, you need to define it with the following format: container [description] [technology] [tags]
In the container definition, you did not specify the technology. There are two options here:
- Add a technology to the container. This is a bit error prone, you have to know the format by heart and you can simply forget to add the technology.
- Set the tags explicitly. This is the one chosen here.
webshopDatabase = container webshopDatabase "The webshop database" {
    tags "Database"
}
The complete DSL can be found at GitHub. The resulting diagram is the following.

8. Conclusion
Structurizr helps you with creating diagrams according to the C4 model. The diagrams are created by means of a DSL which has several advantages. You need to learn the DSL of course, but this can be learned quite easily.
Discover more from My Developer Planet
Subscribe to get the latest posts sent to your email.