
Creating a continuous deployment pipeline will bring us a step closer to an automated build, test, deploy strategy. In order to create such a pipeline, we need to have access to several tools. Instead of installing these on on-premise servers, we can make use of the AWS cloud offer. Let’s see how this can be accomplished!
1. Introduction
We want to create an automated pipeline in order to ensure that no manual and error prone steps are required for building, testing and deploying the application. When a failure occurs during one of these steps, we will be automatically notified and can take necessary actions in order to resolve the issue.
What will we be doing in this post?
- Create a sample Spring Boot application.
- Push the source code to GitHub.
- Build the application with AWS CodeBuild.
- Create an AWS Elastic Beanstalk environment.
- Create an AWS CodePipeline to glue everything together.
You will need an account at GitHub (which is fairly easy to create) and an account at AWS for this. A step-by-step guide how to create an AWS account can be found in a previous post where we explored AWS Elastic Beanstalk.
The sources which we will be using can be found at GitHub.
2. Create a Sample Project
In order to create the sample project, we go to Spring Initializr, add dependency Spring Web and generate the project.
We add a simple HelloController which will just return a welcome message and the name of the host where the application is running.
@RestController
public class HelloController {

    @GetMapping("/hello")
    public String hello() {
        String message = "Hello AWS Continuous Delivery!";
        try {
            InetAddress ip = InetAddress.getLocalHost();
            message += " From host: " + ip;
        } catch (UnknownHostException e) {
            e.printStackTrace();
        }
        return message;
    }

}
Run the application locally:
$ mvn spring-boot:run
Invoke the URL and the welcome message is displayed:
$ curl http://localhost:8080/hello
Hello AWS Continuous Delivery! From host: your-computer-name/127.0.1.1
We will also create a test for this. We are going to create a pipeline and automated test execution is a vital part of a delivery pipeline. The test invokes the URL and verifies whether the welcome message is returned.
@SpringBootTest
@AutoConfigureMockMvc
class MyAwsCdPlanetApplicationTests {

    @Autowired
    private MockMvc mockMvc;

    @Test
    void verifyHelloMessage() throws Exception {
        String patternString = "(Hello AWS Continuous Delivery! From host: ).*\\/\\d+.\\d+.\\d+.\\d+";
        Matcher<String> regexMatcher = Matchers.matchesRegex(patternString);

        this.mockMvc.perform(get("/hello")).andExpect(status().isOk())
                .andExpect(content().string(regexMatcher));
    }

}
Build the application, run the tests and create the jar file with:
$ mvn clean install
We also need to set the server port to 5000 in the application.properties file because we will deploy the application to AWS Elastic Beanstalk. For more info on AWS Elastic Beanstalk, see one of our previous posts.
server.port=5000
Finally, push the source files to GitHub.
3. Build the Application With CodeBuild
In order to create a pipeline, we will need to be able to build the application with AWS CodeBuild. In this section, we will do the necessary setup in order to create a build project for our Spring Boot Application.
Navigate to the AWS Management Console and search for CodeBuild.

Click the Create build project button in the top right corner.

Give the project a suiteable name, we name it MyAWSCDPlanet.

Choose GitHub as Source provider, choose Connect via OAuth and click the Connect to GitHub button. A window is shown in order to confirm that AWS may access your repositories.
Fill in the Repository URL. You will need to fork the repository first into your own account before you can execute these steps yourself.

In the Environment section, do the following:
- Choose Managed Image as Environment Image.
- Choose Amazon Linux 2 as Operating System.
- Choose Standard as Runtime.
- Choose aws/codebuild/amazonlinux2-x86_64-standard:3.0 as Image.
- Choose Always use the latest image for this runtime version as Image version.

In the BuildSpec section, choose Insert build commands and add the following buildspec after clicking the Edit button.
version: 0.2

phases:
  install:
    runtime-versions:
      java: corretto11
  build:
    commands:
      - echo Build started on `date`
      - mvn clean install
artifacts:
  files:
    - target/myawscdplanet-0.0.1-SNAPSHOT.jar
  discard-paths: yes

At the end, click the Create build project button at the bottom of the page.
In the build project dashboard, click the Start build button. A new screen is shown, just click the Start build button at the bottom of the page. When everything is ok, the build succeeds successfully.
4. Create AWS Beanstalk Environment
Now that we can build the application on AWS CodeBuild, we will also need a way to deploy the application to AWS Elastic Beanstalk. In this section, we will create the AWS Elastic Beanstalk environment.
Log in to the AWS Management Console and search for the Elastic Beanstalk service.

Create a new application by clicking the Create Application button in the top right corner.

Give your application a name, we choose MyAWSCDPlanet.

Choose Java as platform. We created the Spring Boot application as a Java 11 application, therefore choose Coretto 11 as Platform branch.

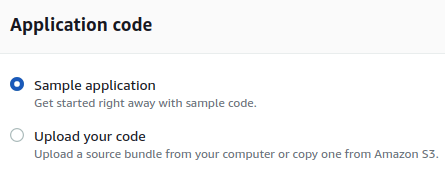
Leave the application code to Sample application and create the application. We will deploy our application as part of the delivery pipeline, so it is ok to choose the sample application at this stage. We just want to setup the environment at this moment.
A console window is shown which shows progress information. After a few minutes a green check mark is shown indicating that the environment is up and running.

Clicking on the link above the check mark brings you to a default webpage of the sample application.
Next, go to the Configuration section and click the Edit button of the Capacity section.

Set the Environment type to Single Instance. If we do not do so, a load balancer is instantiated and this might give some extra costs. Click the Apply button at the bottom right corner of the page.

A warning is raised telling us this will reduce our capacity. We know what we are doing and can confirm this message.

Wait again a few minutes and check the application link again in order to verify the sample application is running and accessible.
5. Create a Pipeline With CodePipeline
Now that we have put the source code in GitHub, created a build and created an environment, it is time to tie all these pieces together by means of AWS CodePipeline.
In the same section where we created the CodeBuild, we navigate to the Pipeline section and click the Create pipeline button.

Give the pipeline a name, we choose MyAWSCDPlanet, and click the Next button.

We choose GitHub (Version 2) as a Source provider and click the Connect to GitHub button.

A popup window is shown where we give the connection with GitHub a name (again we choose MyAWSCDPlanet) and click the Connect to GitHub button.

Next, after confirming the permissions which are required, click the Install a new app button.

Again a popup window is shown where we can select the repositories the App connection is allowed to access. We choose only the repository we want to access and click the Install button.

Fill in your credentials and click the Connect button in the Connect to GitHub screen. Finally, we are connected to GitHub. Next, fill in the Repository name and the Branch name (we only want to deploy the app from the master branch) and choose the CodePipeline default as output format. Finally, click the Next button.

In the build stage, choose AWS CodeBuild as Build provider and select the previously created build project as Project name. Click the Next button.

In the deploy stage, choose AWS Elastic Beanstalk as Deploy provider. Fill in the previously created Elastic Beanstalk project as Application name, select the environment and click the Next button.

A review page is shown where you can double check the configuration. When everything seems ok, just press the Create pipeline button at the bottom of the page.
The pipeline will run for the first time. Each stage will indicate whether it is successfull and at the end, in the deploy stage, we can click the AWS Elastic Beanstalk link. This will open the Elastic Beanstalk environment. From this point on, we can click the URL of the environment and add /hello to the URL which will display the welcome message.

The URL returns (where the ip will be different in your case):
Hello AWS Continuous Delivery! From host: ip-172-31-2-222.eu-west-3.compute.internal/172.31.2.222
Great! We now have completed the continuous delivery pipeline on AWS.
6. Make a Change
Let’s see what happens when we make a change to the code. We add the word again to the welcome message and commit and push the change to GitHub.
String message = "Hello again AWS Continuous Delivery!";
The pipeline detects the change and almost immediately starts checking out the code and starts building. Because we did not alter the test, the build fails and the deploy step is not executed.

We first need to fix the test. It is as simple as adding the word again to the patternString.
String patternString = "(Hello again AWS Continuous Delivery! From host: ).*\\/\\d+.\\d+.\\d+.\\d+";
Run mvn clean install first locally on your development machine in order to verify whether the test is successful now (which we had to do in the first place).
After committing and pushing the source code to GitHub, the pipeline finishes successfully this time. When we invoke the URL, the new hello message is returned.
Hello again AWS Continuous Delivery! From host: ip-172-31-2-222.eu-west-3.compute.internal/172.31.2.222
7. Cleanup the AWS Resources
After you are done with experimenting with all of the above, it is wise to cleanup all of the resources.
Remove the AWS Elastic Beanstalk environment. Navigate to the AWS Elastic Beanstalk Applications, select the radio button of MyAWSCDPlanet and select Terminate Environment from the Actions menu at the right top corner. After this, select MyAWSCDPlanet again and choose Delete application from the Actions menu.

Remove the AWS CodePipeline. Navigate to the AWS CodePipeline section, select the radio button of MyAWSCDPlanet and click the Delete pipeline button.

Remove the Amazon S3 resources. Navigate to the Amazon S3 section, select the radio button of codepipeline-<some id>, first click the Empty button and finally click the Delete button. Probably, you will first need to empty the button prior to deleting it. Use the Empty button for this.

Remove the AWS CodeBuild. Navigate to the AWS CodeBuild section, select the radio button of MyAWSCDPlanet and click the Delete build project button.

All used resources should be removed by now.
8. Conclusion
Setting up a continuous delivery pipeline with AWS is easy. The build itself runs inside a Docker container and it is also possible to add extra review steps to the pipeline if you would like to do so. But this will be something for a next blog.
Discover more from My Developer Planet
Subscribe to get the latest posts sent to your email.
Thanks for that article. It got my codepipeline finally functioning. Tips: After I still needed to update the Elastic Beanstalk environment in the configure to add SERVER_PORT 5000 to get the health checks to pass.
I was also confused in the buildspec.yml. For anyone else who is confused don’t forget to change the “myawscdplanet” to whatever your jar will be called.
artifacts:
files:
– target/myawscdplanet-0.0.1-SNAPSHOT.jar
Thank you for the feedback and sharing your findings with others.