
In this blog, you will get a short introduction into AWS Step Functions. You will also create a workflow from scratch with a lambda. The output of the lambda will be transformed so that it can be used in the workflow.
1. Introduction
AWS Step Functions is a low-code, visual workflow service in order to build applications. The goal is to focus on the business logic and to combine services with each other in a visual way. You can make use drag-and-drop in order to create a workflow and to integrate services. More information about AWS Step Functions can be found at the AWS website. The easiest way to discover how it looks like, is to create a workflow by yourself and that is exactly what you are going to do.
In the remainder of this blog, you will create an AWS Lambda which has been used in previous blogs. So, you do not need to develop the lambda yourself, you can just make use of it. Around this lambda you will create a workflow. During this exercise, you will encounter some problems which will be solved along the way.
2. Create Lambda
In this section, you will create the lambda which will be used in the workflow.
Navigate to the AWS Lambda service and click the Create Function button.
Choose Author from scratch, give the lambda the name MyStepFunctionsLambda and choose as runtime Java 11 (Corretto). Click the Create function button.

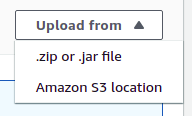
Download the jar file of the lambda from the releases page at GitHub. In the Code source section, choose for .zip or .jar file from the Upload from dropdown box.
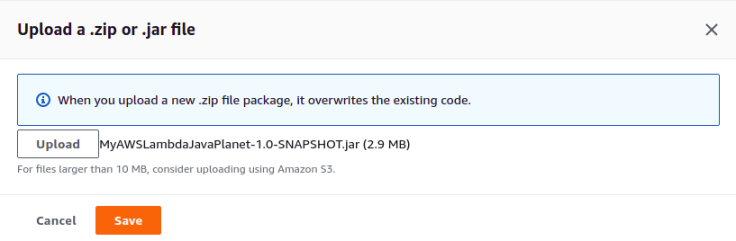
Upload the jar file and click the Save button.
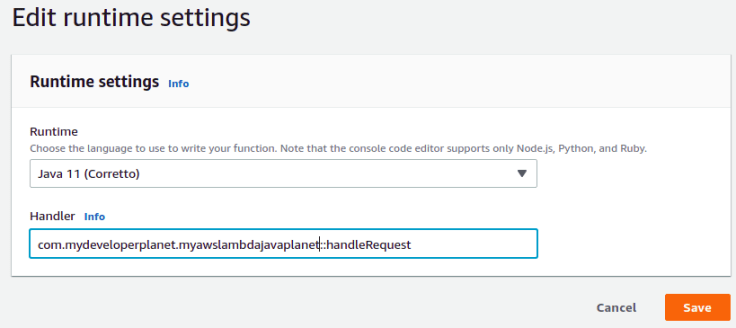
In the Runtime settings section, click the Edit button. Fill the following text in the Handler input field.
com.mydeveloperplanet.myawslambdajavaplanet.LambdaJava::handleRequest
Click the Save button.

In order to verify whether the lambda functions properly, just click the Test button in the Test tab. As a response "Version 1" is returned. The lambda also can take a JSON as input and will log some data, but you will not use this functionality in this blog.
3. Create Workflow
In this section, you will create a basic workflow which will only invoke the lambda function.
Navigate to the Step Functions service and click the Create state machine button.
In Step 1, choose for Design your workflow visually and choose the Standard type. Click the Next button.

In Step 2, the visual workflow designer is shown.

Drag the AWS Lambda Invoke component from the Actions menu to Drag first state here in the form.
On the right submenu Configuration, navigate to the API parameters section and choose from the dropdown list the MyStepFunctionsLambda as Function name. Click the Next button.

In Step 3, the generated code can be reviewed. Besides creating the workflow by means of the visual designer, it is also possible to create the workflow by means of a JSON configuration file. It is less easy to follow the flow when the workflow starts getting a bit more complex, but for small workflows it is quite ok. Besides that, the JSON file can be put into version control which allows you to track the changes made to the workflow. Click the Next button.

In Step 4, give the workflow the name MyFirstStepFunctions, scroll to the bottom of the page and click the Create state machine button.

Click the Start execution button.

A popup window is shown where you can enter some input for the workflow. Leave it as default and click the Start execution button.

The workflow is executed and when the lambda is successful, it is marked as green. Click the Step output tab and notice that the expected lambda output is shown.

It might be that the following error occurs after executing the step function. Just, wait a bit and try a second time and probably it will work then.
Neither the global service principal states.amazonaws.com, nor the regional one is authorized to assume the provided role.
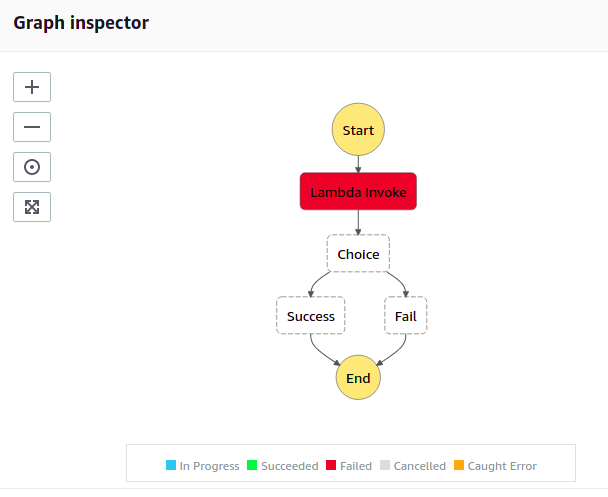
4. Add Choice State
The above workflow is quite simple, so let’s try to add a Choice after the lambda which will set the workflow to a success state when Version 1 is returned from the lambda and otherwise the workflow will be set to a failed state.
At the top of the page, click the Edit button.

In the Edit screen, click the Workflow studio button.

In the left menu, select the Flow tab and drag the Choice component between the lambda and the End state.

Next, drag the Success component in branch Rule #1 and drag the Fail component in branch Default.

Select the Choice component and click the Edit icon in the Configuration tab next to Rule #1.

The configuration for Rule #1 is expanded. Click the Add conditions button.

In the popup window, the condition for Rule #1 can be configured. Here a problem arises in combination with the lambda you use. The lambda outputs a string as value, but the Variable for the condition must make use of a JsonPath. This means that the lambda should output a JSON instead of a string. Let’s assume for a moment that the lambda will output a version JSON parameter containing the text of the version and when the lambda outputs Version 1, the workflow should be successful. Click the Save conditions button.

Next, click the Apply and exit button in order to save the workflow in the visual designer.

Strange thing is that after this, the workflow is not yet saved. So, do not forget to click the Save button in the workflow screen.

A warning is shown, click the Save anyway button.

Start the execution of the workflow. The workflow fails, which is not directly visible from the workfow itself but in the event log below the workflow.

The error in the event log.
{
  "error": "States.Runtime",
  "cause": "An error occurred while executing the state 'Choice' (entered at the event id #7). Invalid path '$.version': The choice state's condition path references an invalid value."
}
5. Transform Lambda Output
Two options exist now in order to fix the problem with the lambda output:
- Adapt the lambda in order that it outputs a JSON;
- Transform the lambda output in the workflow.
The last option is chosen here, because when you have to change the code of the lambda each time you need something specific for a workflow, you do not have much benefit of a low-code platform.
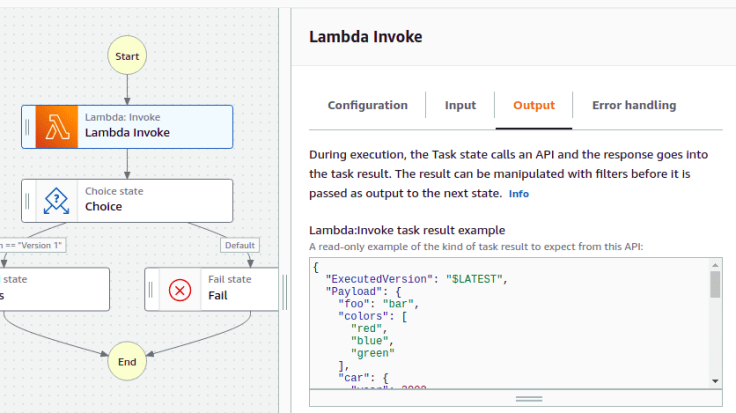
Navigate to the Workfow Studio, select the lambda and select the Output tab. In this tab, an example is shown of the lambda task result. Copy the contents of this example.
In the left menu, choose for Data flow simulator. With this tool it is possible to test the different transformations you want to create. Click the Task Result tab and paste the task result example into the Task result field.

In the example, the payload is not the output of the lambda you are using. Therefore, change the payload from:
"Payload": {
    "foo": "bar",
    "colors": [
      "red",
      "blue",
      "green"
    ],
    "car": {
      "year": 2008,
      "make": "Toyota",
      "model": "Matrix"
    }
  },
into:
"Payload": "Version 1",
Click the ResultSelector tab and paste the following transformation in the ResultSelector field.
{
  "version.$": "$.Payload"
}
As can be seen in the fields at the bottom of the page, the transformation is exactly what is expected.

Now that you know that the transformation is correct, navigate again to the workflow via the Workflow Studio. Select the lambda and the Output tab. Enable Transform result with ResultSelector and paste the transformation JSON into the field.
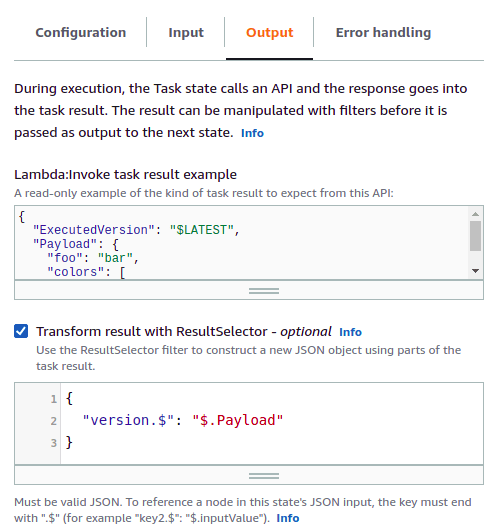
Also, disable Filter output with OutputPath because the output is already in the correct format after the ResultSelector.

Save the workflow as you did before and execute the workflow. The success branch is now entered, just as expected.

More information about transformations can be found here.
6. Error Handling
As seen before, when something goes wrong during execution of the workflow, the workflow does not end gracefully. First, let’s fail the lambda. Navigate to the lambda service, select the lambda and edit the Runtime settings. Remove for example something from the Handler path. In the example below .LambdaJava is removed.
Test the lambda and it will fail. Navigate to the workflow again and execute the workflow. The lambda fails, but the workflow does not end gracefully.
Edit the workflow, select the lambda and select the Error Handling tab. Click the Add new catcher button.

In the Errors field choose for States.ALL in order to catch all failures. In the Fallback state field choose for Add new state.

Drag a Fail component after the catch and give it the name Fail after error.

Save the workflow and execute it. The workflow now ends gracefully.

7. Conclusion
In this blog, AWS Step Functions were introduced mainly by means of an example. The visualization and low-code functions will have their use cases but I do prefer plain coding than a tool like this. It can become quite complex when workflows become large and I doubt that you will have enough overview of what is happening where. Especially when you start transforming inputs and outputs in the workflow. So, it is a nice service of AWS but I do not think I will ever use this.
Discover more from My Developer Planet
Subscribe to get the latest posts sent to your email.