In this post we will take a closer look at Java 9 Modules. The focus lies on how modules affect us when using an IDE like IntelliJ and using a build tool like Maven. It is advised to read the post Java 9 Modules introduction (part 1). We will use the same example, starting with a single module application and afterwards converting it into a multi-module application. The examples used, can be found on GitHub.
Maven modules, Java modules and IntelliJ modules
Before we start, it is good to take a look at the difference between Maven modules, Java modules and IntelliJ modules.
Maven modules are a way to organize your project in several subprojects (modules). With Maven you can control the versions of these modules and the dependencies between these modules. Each module will produce an artifact.
Java modules are a way to stronger encapsulate your classes, it does not provide any means to control the version of an artifact your are using.
So, Maven modules and Java modules serve a different purpose. The confusing part is that the same term module is used while they represent something different. But as long as we know the difference, this should not be a problem.
To make it even more confusing, IntelliJ also knows the term module. It is a way to group files. In the examples below, we will use it to organize our Maven modules.
Basic example
I have used IntelliJ IDEA Community Edition 2017.3. The basic example can be found in the GitHub repository in branch feature/basic-example.
First, we create a new Mavenproject in IntelliJ. The following directory structure is automatically created.
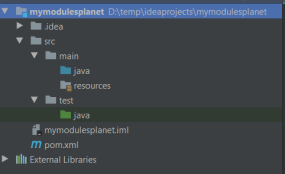
Now it is time to add the Java module to the example. Remember, in part 1, we added the Java module right below the src directory. But with Maven, the convention is to place the sources in directory src – main – java. So, we will create the Java module inside this directory.
Right-click the directory src – main – java and select New – module-info.java. At least, that is what the help pages of JetBrains say. But the option module-info.java did not show up in my context menu. I solved it by right-clicking the directory src – main – java and choose the option Open Module Settings. For some reason it was set to the language level of Java 5. After changing it to Java 9, the option was available.

Now, create the module-info.java and call the module com.mydeveloperplanet.jpmshello.
Create the package com.mydeveloperplanet.jpmshello by right-clicking the src – main – java directory and choose New – Package.
Inside the just created package, we create the HelloModules.java class by right-clicking the package and choose New – Java Class.
package com.mydeveloperplanet.jpmshello;

public class HelloModules {

  public static void main(String[] args) {
    System.out.println("Hello Modules!");
  }

}
It is time to run the application. In the left bottom corner, click the left mouse button and select Maven Projects. This opens the Maven Projects window. Select the clean and install targets, right-click and choose Create ‘mymodulesplanet [cle…’…
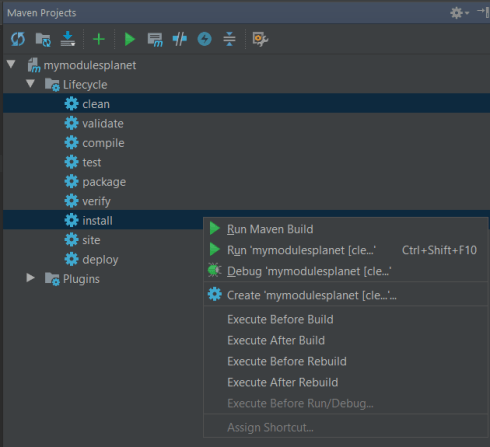
This opens the Create Run/Debug Configuration window, just click the OK button. The run configuration is now available in the Maven Projects window below Run Configurations.
Right-click the configuration and select Run. The Maven build is being built and the build is successful. But, nothing much has happened actually 🙁 . Our default pom.xml as generated by IntelliJ has the following content.
<?xml version="1.0" encoding="UTF-8"?>
<project xmlns="http://maven.apache.org/POM/4.0.0"
 xmlns:xsi="http://www.w3.org/2001/XMLSchema-instance"
 xsi:schemaLocation="http://maven.apache.org/POM/4.0.0 http://maven.apache.org/xsd/maven-4.0.0.xsd">
 <modelVersion>4.0.0</modelVersion>

  <groupId>com.mydeveloperplanet</groupId>
  <artifactId>mymodulesplanet</artifactId>
  <packaging>pom</packaging>
  <version>1.0-SNAPSHOT</version>

</project>
Let’s change the pom.xml in order that it will do something.
<?xml version="1.0" encoding="UTF-8"?>
<project xmlns="http://maven.apache.org/POM/4.0.0"
         xmlns:xsi="http://www.w3.org/2001/XMLSchema-instance"
         xsi:schemaLocation="http://maven.apache.org/POM/4.0.0 http://maven.apache.org/xsd/maven-4.0.0.xsd">
  <modelVersion>4.0.0</modelVersion>

  <groupId>com.mydeveloperplanet</groupId>
  <artifactId>mymodulesplanet</artifactId>
  <packaging>jar</packaging>
  <version>1.0-SNAPSHOT</version>

  <properties>
    <maven.version>3.3.9</maven.version>
    <project.build.sourceEncoding>UTF-8</project.build.sourceEncoding>
    <project.reporting.outputEncoding>UTF-8</project.reporting.outputEncoding>
    <jdk.version>1.9</jdk.version>
  </properties>

  <build>
    <pluginManagement>
      <plugins>
        <plugin>
          <groupId>org.apache.maven.plugins</groupId>
          <artifactId>maven-compiler-plugin</artifactId>
          <version>3.7.0</version>
          <configuration>
            <source>${jdk.version}</source>
            <target>${jdk.version}</target>
          </configuration>
        </plugin>
      </plugins>
    </pluginManagement>
    <plugins>
      <plugin>
        <groupId>org.apache.maven.plugins</groupId>
        <artifactId>maven-compiler-plugin</artifactId>
      </plugin>
    </plugins>
  </build>

</project>
When we run this pom file, a mymodulesplanet-1.0-SNAPSHOT.jar is created in the target directory. We can now run the application the same way we did before when using the command line.
java --module-path target/mymodulesplanet-1.0-SNAPSHOT.jar --module com.mydeveloperplanet.jpmshello/com.mydeveloperplanet.jpmshello.HelloModules
And the output is of course the following.
Hello Modules!
Now add the following line to the main method of the HelloModules.java class.
System.out.println("The XML namespace prefix is: " + XML_NS_PREFIX);
IntelliJ will tell you that the constant XML_NS_PREFIX is unkown. With alt + enter the import is added to the class. A warning is shown that the required module java.xml is not read by our module.

IntelliJ lets us solve it easily by selecting the option Add ‘requires java.xml’ directive to module-info.java.

Build the project again with our Maven configuration and run the jar file. The output is:
Hello Modules!
The XML namespace prefix is: xml
Multiple modules
It is time to make things more complicated. The sources can be found in the GitHub repository in the master branch. We are going to add another module com.developerplanet.himodule to the application and will use a class HiModules from the other module in our main module. The contents of HiModule.java is the following:
package com.mydeveloperplanet.jpmshi;

public class HiModules {

  public String getHi() {
    return "Hi Modules!";
  }

}
Refactoring
First, we need to refactor some things in order to make the project structure multi-module ready.
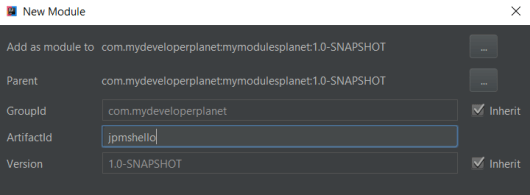
Right-click the mymodulesplanet module and choose New – Module. The following screen is shown:

Choose Next and create the artifact jpmshello.
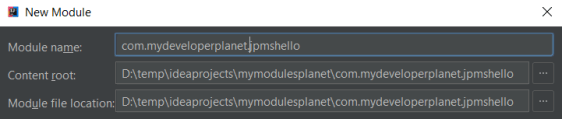
Choose Next and in the next screen we name the module according to the Java module naming convention, namely com.mydeveloperplanet.jpmshello. This way it is clear that it is not only a Maven module but also a Java module. Click Finish.
The following directory structure is now created. We have a com.mydeveloperplanet.jpms Maven module which is also an IntelliJ module and a Java module. Inside this module we have our standard Maven directory structure. IntelliJ also automatically added the com.mydeveloperplanet.jpms Maven module to our root pom.xml file.

Our next step is to move the HelloModules.java file and the module-info.java file to the newly created com.mydeveloperplanet.jpms module. After doing this, remove the root src directory.
Also notice, that the packaging in our root pom.xml has changed into pom instead of jar. We add the jar packaging to the pom.xml of the module com.mydeveloperplanet.jpmshello. This pom.xml now looks like:
<?xml version="1.0" encoding="UTF-8"?>
<project xmlns="http://maven.apache.org/POM/4.0.0"
 xmlns:xsi="http://www.w3.org/2001/XMLSchema-instance"
 xsi:schemaLocation="http://maven.apache.org/POM/4.0.0 http://maven.apache.org/xsd/maven-4.0.0.xsd">
  <parent>
    <artifactId>mymodulesplanet</artifactId>
    <groupId>com.mydeveloperplanet</groupId>
    <version>1.0-SNAPSHOT</version>
  </parent>
  <modelVersion>4.0.0</modelVersion>

  <artifactId>jpmshello</artifactId>
  <packaging>jar</packaging>

</project>
Let’s build the application again, just like we did before. The build is of course successful 😉 . After the build, the root target directory is removed and a new target directory is added below the module com.mydeveloperplanet.jpmshello. The jar file jpmshello-1.0-SNAPSHOT.jar is available in this directory.
Run the application with the following command from the root directory. Notice that the module-path has changed and the jar file.
java --module-path com.mydeveloperplanet.jpmshello/target/jpmshello-1.0-SNAPSHOT.jar --module com.mydeveloperplanet.jpmshello/com.mydeveloperplanet.jpmshello.HelloModules
The output is as expected.
Add second module
Add the module com.mydeveloperplanet.jpmshi, add the HiModules.java class and change the packaging of the pom.xml into jar. For some reason, I had to indicate in the module settings what the sources and test directory was. Normally seen, IntelliJ had to do this automatically.
Also add the following module-info.java to the src – main -java directory of the module.
module com.mydeveloperplanet.jpmshi {
  exports com.mydeveloperplanet.jpmshi;
}
And to conclude with, add the following to the Main method of HelloModules.java.
HiModules hiModules = new HiModules();
System.out.println(hiModules.getHi());
IntelliJ again warns us that we are missing a required module in the module-info.java of module com.mydeveloperplanet.jpmshello. With the quick-fix, it is easily resolved. Also a dependency on the Maven module in the pom.xml of com.mydeveloperplanet.jpmshello is needed.
<artifactId>jpmshello</artifactId>
<packaging>jar</packaging>
<dependencies>
  <dependency>
    <groupId>com.mydeveloperplanet</groupId>
    <artifactId>jpmshi</artifactId>
    <version>1.0-SNAPSHOT</version>
  </dependency>
</dependencies>
Run the application using the following command executed from the root of the project.
java --module-path com.mydeveloperplanet.jpmshello/target/jpmshello-1.0-SNAPSHOT.jar;com.mydeveloperplanet.jpmshi/target/jpmshi-1.0-SNAPSHOT.jar --module com.mydeveloperplanet.jpmshello/com.mydeveloperplanet.jpmshello.HelloModules
The output is as expected.
Hello Modules!
The XML namespace prefix is: xml
Hi Modules!
Summary
In this post, we created the example from part 1 with IntelliJ and Maven. We created the example from scratch, starting with a single module application and afterwards converting it into a multi-module application. We also saw how IntelliJ helps us in configuring the Maven pom files and the Java module-info.java files in order to make our lives a bit easier 😉
In the next Modules post (part 3) we will take a closer look at the modules directives. This will be the last post in this modules series.
Discover more from My Developer Planet
Subscribe to get the latest posts sent to your email.