
In this blog, you will learn how to set up the OpenID Connect Authorization Code Flow using Keycloak. You will execute the flow yourself in order to get a better understanding of OIDC. Enjoy!
1. Introduction
Adding security to your application is almost always necessary. It is also something developers seem to find difficult to grasp. Therefore, you need to understand the concepts of security. Nowadays, the default is to use OpenID Connect (OIDC) for authentication. OIDC is a layer on top of OAuth2.0 which takes care of the authorization. Authentication is about identifying the person (or system) who logs in to an application, authorization is about which permissions you are granted in the application.
The concept of OAuth2.0 and OIDC is excellently explained in this blog: An Illustrated Guide to OAuth and OpenID Connect. It is strongly advised to read this, the terminology will become much clearer.
In the remainder of this blog, you will explore Keycloak, a widely-used authentication and authorization provider. You will learn how to setup Keycloak and experiment with the Authorization Code Flow.
Sources used in this blog can be found at GitHub.
2. Prerequisites
Prerequisites for reading this blog are:
- Knowledge of OAuth2.0 and OpenID Connect, see the previous reference for more information. Also check out this great series on SivaLabs.
- Basic knowledge of Docker (Compose).
- Basic knowledge of
curl.
3. Basic OIDC
As mentioned in the introduction, do read An Illustrated Guide to OAuth and OpenID Connect. As a summary, some terminology is explained in this paragraph.
- Resource server: the server which hosts the API you want to access.
- Resource owner: the owner of the identity, that is you if you are the one who logs in.
- Authorization server: the server that knows the Resource owner, the Resource owner has an account at the Authorization server. The Authorization server is often also an Authentication server.
- Client: the Client that wants to access the data on behalf of the Resource owner.
- Client ID: a unique ID to identify the Client with the Authorization server.
- Client Secret: a secret password known by the Client and the Authorization server.
- Token: several tokens exist.
- ID token: contains user-centric attributes (claims) about the identity in the form of a JSON Web Token (JWT). The Client can use this in order to verify the user’s identity.
- Access token: a short-lived token in order to access data from the Resource owner. Contains scopes, permissions, and sometimes limited user information, but is primarily focused on what actions or resources the client can access. For Keycloak, this is also in the form of a JWT.
- Refresh token: a long-lived token which can be used to obtain a new Access token without the need to authenticate again.
- Authorization code: a short-lived token the Client will use to exchange with the Authorization server in order to obtain an Access token.
- Redirect URI: also know as the callback URL, the Authorization server will use this to pass data to the Client.
- Scope: a set of claims with a specific name.
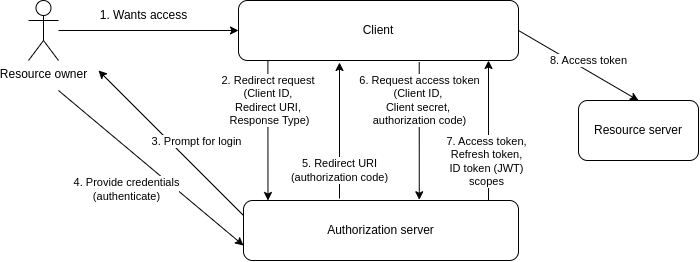
The following diagram explains the OpenID Connect Authorization Code Flow.
4. Setup Keycloak
4.1 Run Container
The easiest way to start Keycloak is by running it as a container. The following docker compose file can be used for this purpose.
services:
  keycloak:
    image: quay.io/keycloak/keycloak:26.1.4
    container_name: keycloak
    environment:
      - KC_BOOTSTRAP_ADMIN_USERNAME=admin
      - KC_BOOTSTRAP_ADMIN_PASSWORD=admin
    ports:
      - "8081:8080"
    command: start-dev
Start the compose file as follows:
docker compose up -d
The Keycloak admin console can be started via http://localhost:8081/admin. You can log in with the credentials admin/admin. Needless to say, but you should change this in a production environment.
4.2 Create Realm
After login, you will see a master realm. A realm corresponds with a tenant, so you should create a specific realm for the tenant first. Click the master realm at the top left corner and click the Create realm button.

Create realm mydeveloperplanet and click the Create button.

4.3 Create Client
Create a client which will use the Authorization code flow with PKCE flow, which is the standard flow to be used for web applications. In the left menu choose Clients and click the Create client button.
Choose the following:
- Client type: OpenID Connect
- Client ID: application-1 (this will identify your client)
- Name: Application 1

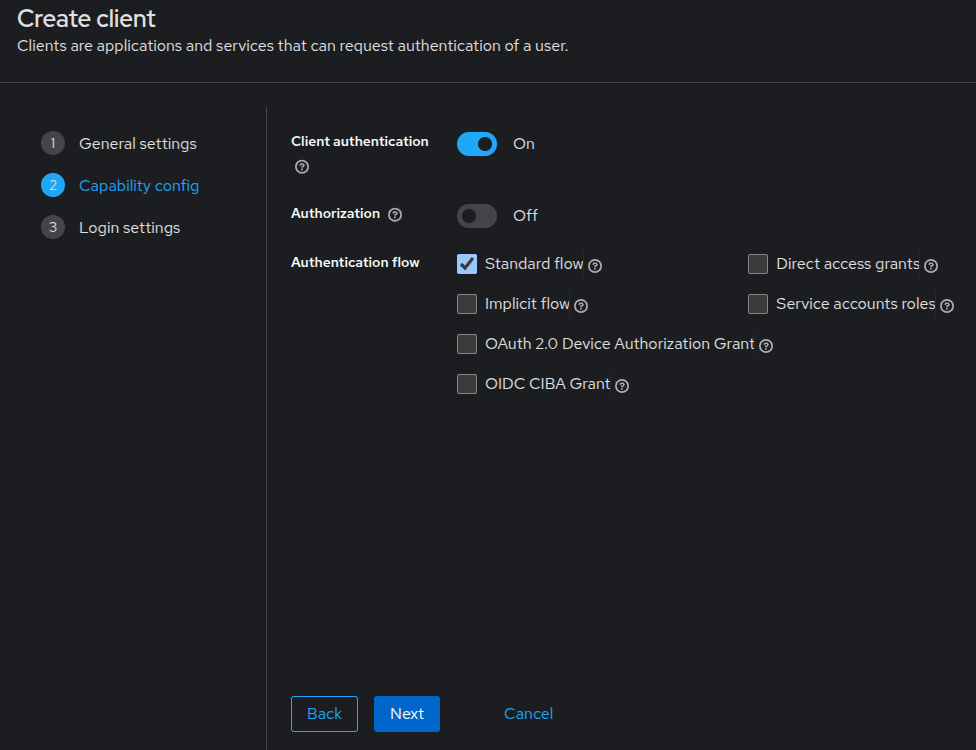
Click the Next button. Choose the following:
- Client authentication: enable this, it will set the OIDC access type to confidential, otherwise public is applicable.
- Authentication flow:
- Standard flow: is already enabled by default, leave it as is. This enables the Authorization code flow for this client.
- Direct access grants: disable it.
Click the Next button. Choose the following.
- Valid redirect URIs: http://localhost:8080/callback (this will be used to send the access token to your application).
- Web origins: http://localhost:8080 (to define the origin of the request, assuming the application runs on localhost port 8080).

Click the Save button and the client is created.
4.4 Create User
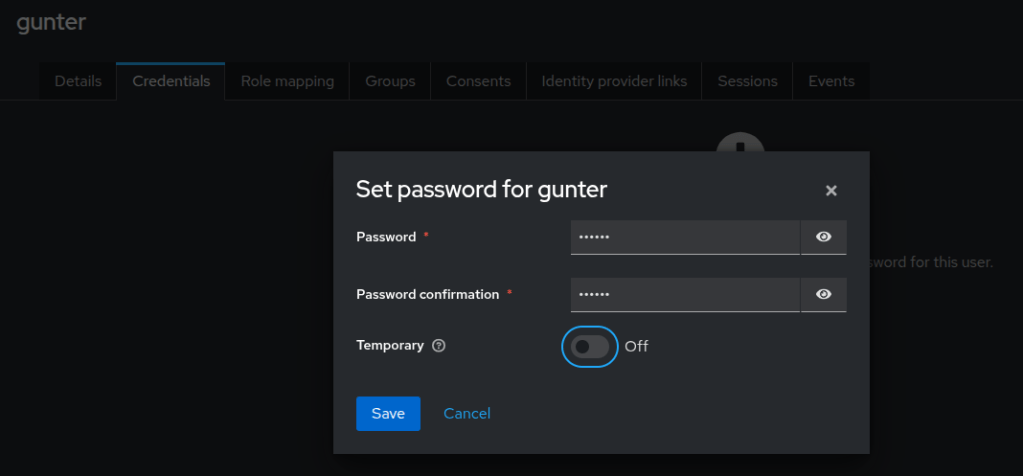
You also need a user, otherwise you have nothing to login with. Choose in the left menu for Users and click the Create new user button. Choose a username and click the Create button.

Click the Credentials tab and click the Set password button. Choose a password and disable Temporary.
Open an incognito window in your browser and navigate to http://localhost:8081/realms/mydeveloperplanet/account.
Fill in your credentials and you have to fill in some mandatory fields.
- Email: a.a@example.com
- First name: Gunter
- Last name: Mydeveloperplanet

Click the Submit button and you are logged in. Close the window.
5. Authorization Code Flow
Now it is time to see how the Authorization Code Flow works. Keep in mind the illustration.
5.1 Endpoints
Navigate in the admin console to the mydeveloperplanet realm and choose in the left menu for Configure – Realm settings. At the bottom, you will see Endpoints and a link to OpenID Endpoint Configuration.
This will show you a JSON with endpoints you will need in order to establish a connection.
{
  "issuer": "http://localhost:8081/realms/mydeveloperplanet",
  "authorization_endpoint": "http://localhost:8081/realms/mydeveloperplanet/protocol/openid-connect/auth",
  "token_endpoint": "http://localhost:8081/realms/mydeveloperplanet/protocol/openid-connect/token",
  "introspection_endpoint": "http://localhost:8081/realms/mydeveloperplanet/protocol/openid-connect/token/introspect",
  "userinfo_endpoint": "http://localhost:8081/realms/mydeveloperplanet/protocol/openid-connect/userinfo",
  "end_session_endpoint": "http://localhost:8081/realms/mydeveloperplanet/protocol/openid-connect/logout",
  "frontchannel_logout_session_supported": true,
  "frontchannel_logout_supported": true,
  "jwks_uri": "http://localhost:8081/realms/mydeveloperplanet/protocol/openid-connect/certs",
  "check_session_iframe": "http://localhost:8081/realms/mydeveloperplanet/protocol/openid-connect/login-status-iframe.html",
  "grant_types_supported": [
    "authorization_code",
    "implicit",
    "refresh_token",
    "password",
    "client_credentials",
    "urn:openid:params:grant-type:ciba",
    "urn:ietf:params:oauth:grant-type:device_code"
  ],
  "acr_values_supported": [
    "0",
    "1"
  ],
  "response_types_supported": [
    "code",
    "none",
    "id_token",
    "token",
    "id_token token",
    "code id_token",
    "code token",
    "code id_token token"
  ],
  ...
5.2 Retrieve Authorization Code
You need an authorization code first. Therefore, you use the authorization code endpoint together with the following information:
- Client ID: the client ID as registered in Keycloak.
- Response Type: you want an authorization code to be returned.
- Redirect URI: the one configured in Keycloak.
In the browser enter the following URL: http://localhost:8081/realms/mydeveloperplanet/protocol/openid-connect/auth?client_id=application-1&response_type=code&redirect_uri=http://localhost:8080/callback&scope=openid
You will be asked to enter your credentials of the user you created before.
Because no application is running, you will receive a message that the server of the redirect URL cannot be reached. However, do take a closer look at the URL in the browser address bar. The callback URL is visible including a code in the parameters. This is the authorization code.
5.3 Retrieve Access Token
A client is now able to contact the Authorization Server (Keycloak) and retrieve an access token. Use the token endpoint for this purpose together with the following information:
- Grant Type: you are using an authorization code.
- Client ID: the client ID as registered in Keycloak.
- Client Secret: in the admin console, navigate to the mydeveloperplanet realm, select the application-1 client and click the Credentials tab. The Client secret is available here.
- Code: the authorization code returned from the previous paragraph.
- Redirect URI: the one configured in Keycloak.
In a terminal (not the browser), enter the following command. Replace the Client Secret and Code with your own values. An error is returned.
$ curl -X POST \
"http://localhost:8081/realms/mydeveloperplanet/protocol/openid-connect/token" \
-H "Content-Type: application/x-www-form-urlencoded" \
-d "grant_type=authorization_code" \
-d "client_id=application-1" \
-d "client_secret=U5UCgtTzrYbxKJ3aiDnre7WdPIwufFmp" \
-d "code=b989b09c-37f6-447d-ab44-ba112e757198.8d04f81b-40ec-4957-b822-a2a5b474c0e4.ff25ccf8-6faf-4fe2-8fe2-03813df493ed" \
-d "redirect_uri=http://localhost:8080/callback"
{"error":"invalid_grant","error_description":"Code not valid"}
If you have executed the steps from this blog, it probably took some time. Therefore, the authorization code is not valid anymore.
Retrieve a new authorization code and be fast enough this time.
$ curl -X POST \
"http://localhost:8081/realms/mydeveloperplanet/protocol/openid-connect/token" \
-H "Content-Type: application/x-www-form-urlencoded" \
-d "grant_type=authorization_code" \
-d "client_id=application-1" \
-d "client_secret=U5UCgtTzrYbxKJ3aiDnre7WdPIwufFmp" \
-d "code=81b9deab-20cb-4fdd-8256-c889c0b6ab07.8d04f81b-40ec-4957-b822-a2a5b474c0e4.ff25ccf8-6faf-4fe2-8fe2-03813df493ed" \
-d "redirect_uri=http://localhost:8080/callback"
{"access_token":"eyJhbGciOiJSUzI1NiIsInR5cCIgOiAiSldUIiwia2lkIiA6ICJ2Y2JkZjUyRDY5SmNDUnJBQ2dmU0wyc0FPVlBRMWVIUDJBamoxVFF3a1VJIn0.eyJleHAiOjE3NDQ0NTM1OTgsImlhdCI6MTc0NDQ1MzI5OCwiYXV0aF90aW1lIjoxNzQ0NDUyNTAyLCJqdGkiOiI1ZWNhMjNmYi0yNzZiLTQzOTItYWJkZS04ZmNkZTNiZGUyNDQiLCJpc3MiOiJodHRwOi8vbG9jYWxob3N0OjgwODEvcmVhbG1zL215ZGV2ZWxvcGVycGxhbmV0IiwiYXVkIjoiYWNjb3VudCIsInN1YiI6ImY2ZjE0MGMyLTVjOGQtNDUzMi1iOGMxLTY3MWY2MmJjZDVkMSIsInR5cCI6IkJlYXJlciIsImF6cCI6ImFwcGxpY2F0aW9uLTEiLCJzaWQiOiI4ZDA0ZjgxYi00MGVjLTQ5NTctYjgyMi1hMmE1YjQ3NGMwZTQiLCJhY3IiOiIwIiwiYWxsb3dlZC1vcmlnaW5zIjpbImh0dHA6Ly9sb2NhbGhvc3Q6ODA4MCJdLCJyZWFsbV9hY2Nlc3MiOnsicm9sZXMiOlsib2ZmbGluZV9hY2Nlc3MiLCJkZWZhdWx0LXJvbGVzLW15ZGV2ZWxvcGVycGxhbmV0IiwidW1hX2F1dGhvcml6YXRpb24iXX0sInJlc291cmNlX2FjY2VzcyI6eyJhY2NvdW50Ijp7InJvbGVzIjpbIm1hbmFnZS1hY2NvdW50IiwibWFuYWdlLWFjY291bnQtbGlua3MiLCJ2aWV3LXByb2ZpbGUiXX19LCJzY29wZSI6Im9wZW5pZCBlbWFpbCBwcm9maWxlIiwiZW1haWxfdmVyaWZpZWQiOmZhbHNlLCJuYW1lIjoiR3VudGVyIE15ZGV2ZWxvcGVycGxhbmV0IiwicHJlZmVycmVkX3VzZXJuYW1lIjoiZ3VudGVyIiwiZ2l2ZW5fbmFtZSI6Ikd1bnRlciIsImZhbWlseV9uYW1lIjoiTXlkZXZlbG9wZXJwbGFuZXQiLCJlbWFpbCI6ImEuYUBleGFtcGxlLmNvbSJ9.iYuKMBNOZwhANDkhqfGsno8tt8uHMZ-1EL5Z3Lmhpq93iRP6bdSNK3sbyoEtpHIrov4iB5_hh1EMSseYVgLivkx2rQ7FK0S6fM8paeChb3c3A4RWROtCr9oQY7Wqs1-CkZXr5dd0OmxHt89AY2KvmCz_c0LSEhT5Y4P_cf7kuvwHCjeHMHsw7cuJ3_dajGWEBqBcA--28HQ5uwKoYjOheu_vL-Sodi5cqxCLH0AGuFjbTQg748F296VRVYGaZzk3OeAudjB4neI4WErZYzufxhdBn1ZNTzAxPdAEDGqJ28BEwCqMxfw4KJmsMPdQcftWChGqEAPvxToYR7u3rvhZuA","expires_in":300,"refresh_expires_in":1800,"refresh_token":"eyJhbGciOiJIUzUxMiIsInR5cCIgOiAiSldUIiwia2lkIiA6ICI2YzU3YjY2ZC0zZGRmLTQzNDItYTU3Mi0xODM3OTRiNDM3YTYifQ.eyJleHAiOjE3NDQ0NTUwOTgsImlhdCI6MTc0NDQ1MzI5OCwianRpIjoiNjJkOTUxOTMtNDk4Zi00ZWU4LWEzNjgtNjQzNDQ5ZmYwNWZmIiwiaXNzIjoiaHR0cDovL2xvY2FsaG9zdDo4MDgxL3JlYWxtcy9teWRldmVsb3BlcnBsYW5ldCIsImF1ZCI6Imh0dHA6Ly9sb2NhbGhvc3Q6ODA4MS9yZWFsbXMvbXlkZXZlbG9wZXJwbGFuZXQiLCJzdWIiOiJmNmYxNDBjMi01YzhkLTQ1MzItYjhjMS02NzFmNjJiY2Q1ZDEiLCJ0eXAiOiJSZWZyZXNoIiwiYXpwIjoiYXBwbGljYXRpb24tMSIsInNpZCI6IjhkMDRmODFiLTQwZWMtNDk1Ny1iODIyLWEyYTViNDc0YzBlNCIsInNjb3BlIjoib3BlbmlkIHdlYi1vcmlnaW5zIGVtYWlsIGJhc2ljIGFjciByb2xlcyBwcm9maWxlIn0.dTbi_PdzF-qs7M-1pTfEGuTcZ5BR4-sUPQDe1PK_qR8os_yLHlUp6My2LGgXN5976sKPj38Ixf0EQdS8-aG5fA","token_type":"Bearer","id_token":"eyJhbGciOiJSUzI1NiIsInR5cCIgOiAiSldUIiwia2lkIiA6ICJ2Y2JkZjUyRDY5SmNDUnJBQ2dmU0wyc0FPVlBRMWVIUDJBamoxVFF3a1VJIn0.eyJleHAiOjE3NDQ0NTM1OTgsImlhdCI6MTc0NDQ1MzI5OCwiYXV0aF90aW1lIjoxNzQ0NDUyNTAyLCJqdGkiOiIzNDdjY2RkMi0zMTI0LTQwNDctYTQ3Yy0wMThhNThlZmRhMDgiLCJpc3MiOiJodHRwOi8vbG9jYWxob3N0OjgwODEvcmVhbG1zL215ZGV2ZWxvcGVycGxhbmV0IiwiYXVkIjoiYXBwbGljYXRpb24tMSIsInN1YiI6ImY2ZjE0MGMyLTVjOGQtNDUzMi1iOGMxLTY3MWY2MmJjZDVkMSIsInR5cCI6IklEIiwiYXpwIjoiYXBwbGljYXRpb24tMSIsInNpZCI6IjhkMDRmODFiLTQwZWMtNDk1Ny1iODIyLWEyYTViNDc0YzBlNCIsImF0X2hhc2giOiJJMmY3bm9LZUxLLXdUUlpKdEU4Qkp3IiwiYWNyIjoiMCIsImVtYWlsX3ZlcmlmaWVkIjpmYWxzZSwibmFtZSI6Ikd1bnRlciBNeWRldmVsb3BlcnBsYW5ldCIsInByZWZlcnJlZF91c2VybmFtZSI6Imd1bnRlciIsImdpdmVuX25hbWUiOiJHdW50ZXIiLCJmYW1pbHlfbmFtZSI6Ik15ZGV2ZWxvcGVycGxhbmV0IiwiZW1haWwiOiJhLmFAZXhhbXBsZS5jb20ifQ.k9-3RhjUmx3ebXV-qcRP2N8Jt6yroZdJioersk_5pt9N8cy_ZCEPsHOjWktC4yu5O2ykJWRO8Bg9PliiR5CBq5jY2kP-7yYfLsDd0267HihIKzu-HNQMlFg0az31zVYxC11eQUADUnDqczuu4teTOefFw4sAM5HJPNO7IjBWDJOHWiNNSqILBIzTDLfmj-DRsTB5yyCBG5GdGNrHzCHPn8kX4GQ71MPUxpwaADNBnjl0JFpM119IsWg_-nF213B8GOHHx1-wa4735OPVJiRZwSYDS3CjU4YrXSaQ6gXghLYkIOdYnkpLgEECdhUtZKqqdpLhntOuWWGRY-a9sj-a_Q","not-before-policy":0,"session_state":"8d04f81b-40ec-4957-b822-a2a5b474c0e4","scope":"openid email profile"}
5.4 Use Access Token
You have retrieved an access token and this access token can be used to access your application.
curl -X GET \
"https://<api-endpoint>" \
-H "Authorization: Bearer <access-token>"
5.5 Access Token Response
If you take a closer look at the response when retrieving the access token, you will see the following information.
- The access token itself.
- The expiration time of the access token, which is 5 minutes.
- A refresh token and also an expiration of the refresh token. By means of the refresh token, you can retrieve a new access token without the need for logging in again.
- An ID token, more about this later.
- A scope, the permissions the client has.
{
  "access_token": "eyJhbGciOiJSUzI1NiIsInR5cCIgOiAiSldUIiwia2lkIiA6ICJ4U0c4eU5TYk90MTZqZmwyWWRZQjU1WkRocUNoeE9BNlREeWxHWjBXVzcwIn0.eyJleHAiOjE3NDM4Njg4NjIsImlhdCI6MTc0Mzg2ODU2MiwiYXV0aF90aW1lIjoxNzQzODY3OTgxLCJqdGkiOiIxNWM2OGU5NS1kYTUyLTRkZDgtYmJhNC1mNjVhZWYzODU2ZDciLCJpc3MiOiJodHRwOi8vbG9jYWxob3N0OjgwODAvcmVhbG1zL215ZGV2ZWxvcGVycGxhbmV0IiwiYXVkIjoiYWNjb3VudCIsInN1YiI6ImJhMDdiYmE0LWQwMGQtNGNkNC1iYmYzLTNkZDczZGY2YjMwYyIsInR5cCI6IkJlYXJlciIsImF6cCI6ImFwcGxpY2F0aW9uLTEiLCJzaWQiOiIwYzQ3NzZhYy00Y2RkLTQ5OWEtOGQxNC04NDMwY2E5MjY2MTkiLCJhY3IiOiIwIiwiYWxsb3dlZC1vcmlnaW5zIjpbImh0dHA6Ly9sb2NhbGhvc3Q6ODA4MSJdLCJyZWFsbV9hY2Nlc3MiOnsicm9sZXMiOlsib2ZmbGluZV9hY2Nlc3MiLCJkZWZhdWx0LXJvbGVzLW15ZGV2ZWxvcGVycGxhbmV0IiwidW1hX2F1dGhvcml6YXRpb24iXX0sInJlc291cmNlX2FjY2VzcyI6eyJhY2NvdW50Ijp7InJvbGVzIjpbIm1hbmFnZS1hY2NvdW50IiwibWFuYWdlLWFjY291bnQtbGlua3MiLCJ2aWV3LXByb2ZpbGUiXX19LCJzY29wZSI6Im9wZW5pZCBlbWFpbCBwcm9maWxlIiwiZW1haWxfdmVyaWZpZWQiOmZhbHNlLCJuYW1lIjoiR3VudGVyIE15ZGV2ZWxvcGVycGxhbmV0IiwicHJlZmVycmVkX3VzZXJuYW1lIjoiZ3VudGVyIiwiZ2l2ZW5fbmFtZSI6Ikd1bnRlciIsImZhbWlseV9uYW1lIjoiTXlkZXZlbG9wZXJwbGFuZXQiLCJlbWFpbCI6ImEuYUBleGFtcGxlLmNvbSJ9.IaNcjxrjHYnksDMo1384-TsQZ5gxG1sZmZui9aNcw1XfS7S-oEHddOqV3GllYg33eXlBUWjFr7-E4aj6w_roZc3yGeX3OhARywrvdgNKOmRdcGhTjVMxjBTf3n9mYyMlqK7BDSGPkvP3BRiWUYnZHUpuwSfMFADklfwvJyiAVhYLqSISx4D1QzxoFrmXbkVHnKjgLnzb_fVxD38I8w6t3Y3OzdAFKQNAJ1TCUf84CV4eg8TwrpayBIfyXjolWlUma3cQpr7pwXV6KZQFeV8rWoScjURmfOLi0SfvCQ3ldSQOjohd0kC995eECGHAr6npYRtYYZUCfdJSeYS9YmLKqA",
  "expires_in": 300,
  "refresh_expires_in": 1800,
  "refresh_token": "eyJhbGciOiJIUzUxMiIsInR5cCIgOiAiSldUIiwia2lkIiA6ICI5OGNlZDc0Yy02MWVkLTRkMzEtYmMwYi03ZWYzYWVjZDZlZjQifQ.eyJleHAiOjE3NDM4NzAzNjIsImlhdCI6MTc0Mzg2ODU2MiwianRpIjoiYjE2ZWYzYzctODNlNi00ZjQ2LWIzZjItNjc3N2Y0MGEzMzQ4IiwiaXNzIjoiaHR0cDovL2xvY2FsaG9zdDo4MDgwL3JlYWxtcy9teWRldmVsb3BlcnBsYW5ldCIsImF1ZCI6Imh0dHA6Ly9sb2NhbGhvc3Q6ODA4MC9yZWFsbXMvbXlkZXZlbG9wZXJwbGFuZXQiLCJzdWIiOiJiYTA3YmJhNC1kMDBkLTRjZDQtYmJmMy0zZGQ3M2RmNmIzMGMiLCJ0eXAiOiJSZWZyZXNoIiwiYXpwIjoiYXBwbGljYXRpb24tMSIsInNpZCI6IjBjNDc3NmFjLTRjZGQtNDk5YS04ZDE0LTg0MzBjYTkyNjYxOSIsInNjb3BlIjoib3BlbmlkIHdlYi1vcmlnaW5zIGFjciByb2xlcyBlbWFpbCBwcm9maWxlIGJhc2ljIn0.b1M46cDinjosOC4RDu-lXWZDmprUTvXLkymw7cNZe5bDm3b6N3U1kt7gfzhwqUQsVrjOdeAFBWkmOw53EEmrxw",
  "token_type": "Bearer",
  "id_token": "eyJhbGciOiJSUzI1NiIsInR5cCIgOiAiSldUIiwia2lkIiA6ICJ4U0c4eU5TYk90MTZqZmwyWWRZQjU1WkRocUNoeE9BNlREeWxHWjBXVzcwIn0.eyJleHAiOjE3NDM4Njg4NjIsImlhdCI6MTc0Mzg2ODU2MiwiYXV0aF90aW1lIjoxNzQzODY3OTgxLCJqdGkiOiI0MTE3NDA1YS0yMzdkLTQ5YWYtOGViZi1hNTZhNWFhYjdhMDYiLCJpc3MiOiJodHRwOi8vbG9jYWxob3N0OjgwODAvcmVhbG1zL215ZGV2ZWxvcGVycGxhbmV0IiwiYXVkIjoiYXBwbGljYXRpb24tMSIsInN1YiI6ImJhMDdiYmE0LWQwMGQtNGNkNC1iYmYzLTNkZDczZGY2YjMwYyIsInR5cCI6IklEIiwiYXpwIjoiYXBwbGljYXRpb24tMSIsInNpZCI6IjBjNDc3NmFjLTRjZGQtNDk5YS04ZDE0LTg0MzBjYTkyNjYxOSIsImF0X2hhc2giOiJpMUJLTHNkeWtsM09ma0tkRHRtdjhRIiwiYWNyIjoiMCIsImVtYWlsX3ZlcmlmaWVkIjpmYWxzZSwibmFtZSI6Ikd1bnRlciBNeWRldmVsb3BlcnBsYW5ldCIsInByZWZlcnJlZF91c2VybmFtZSI6Imd1bnRlciIsImdpdmVuX25hbWUiOiJHdW50ZXIiLCJmYW1pbHlfbmFtZSI6Ik15ZGV2ZWxvcGVycGxhbmV0IiwiZW1haWwiOiJhLmFAZXhhbXBsZS5jb20ifQ.IHarZQS8Xl98ZIpJGV0i5UW7f7EPFhWWYo_DTaDAHzi6v0FyuSgKZNs5y2tpW9aBWqNQwuAkUGr_s8z2xidwQWVDgLBOgSc6MXkX6UKqVIvOVJom4sP0ByI8ZhKSS8vyI9n2LfUVen3KiHH54rwZiH34rBfMezLpehKcR4DqRRIeJbaVXszk6u7_zxXq2UFU_i7f3wmXUqT1gHZTGayNyj9u7IUlMSWf7m4MI6wE10sPGBWDxyJPyJXNP2DRRcUfwhqd1eibTiHH99TQm8gtSDnMJqhPT4t6tXSO8EYZPPV7b-utcfl8vu3cQ4ooImX93igGOrgvj8oPG6Zw6KItMQ",
  "not-before-policy": 0,
  "session_state": "0c4776ac-4cdd-499a-8d14-8430ca926619",
  "scope": "openid email profile"
}
The ID token is a JSON Web Token (JWT) and contains identity information. Navigate to https://jwt.io/ and past the ID token. The decoded payload data is the following. The data here are called claims.
{
  "exp": 1743868862,
  "iat": 1743868562,
  "auth_time": 1743867981,
  "jti": "4117405a-237d-49af-8ebf-a56a5aab7a06",
  "iss": "http://localhost:8080/realms/mydeveloperplanet",
  "aud": "application-1",
  "sub": "ba07bba4-d00d-4cd4-bbf3-3dd73df6b30c",
  "typ": "ID",
  "azp": "application-1",
  "sid": "0c4776ac-4cdd-499a-8d14-8430ca926619",
  "at_hash": "i1BKLsdykl3OfkKdDtmv8Q",
  "acr": "0",
  "email_verified": false,
  "name": "Gunter Mydeveloperplanet",
  "preferred_username": "gunter",
  "given_name": "Gunter",
  "family_name": "Mydeveloperplanet",
  "email": "a.a@example.com"
}
Some interesting information:
- iss: The issuer URL of this token.
- aud: a list of resource servers for whom this token is applicable for.
- sub: a unique ID for the user.
- name, preferred_username, given_name, family_name and email: identity information.
The access token contains authorization information. In case of Keycloak, the access token is also in JWT format. The decoded payload data is the following. Interesting information here are the scopes and the roles.
{
  "exp": 1743868862,
  "iat": 1743868562,
  "auth_time": 1743867981,
  "jti": "15c68e95-da52-4dd8-bba4-f65aef3856d7",
  "iss": "http://localhost:8080/realms/mydeveloperplanet",
  "aud": "account",
  "sub": "ba07bba4-d00d-4cd4-bbf3-3dd73df6b30c",
  "typ": "Bearer",
  "azp": "application-1",
  "sid": "0c4776ac-4cdd-499a-8d14-8430ca926619",
  "acr": "0",
  "allowed-origins": [
    "http://localhost:8081"
  ],
  "realm_access": {
    "roles": [
      "offline_access",
      "default-roles-mydeveloperplanet",
      "uma_authorization"
    ]
  },
  "resource_access": {
    "account": {
      "roles": [
        "manage-account",
        "manage-account-links",
        "view-profile"
      ]
    }
  },
  "scope": "openid email profile",
  "email_verified": false,
  "name": "Gunter Mydeveloperplanet",
  "preferred_username": "gunter",
  "given_name": "Gunter",
  "family_name": "Mydeveloperplanet",
  "email": "a.a@example.com"
}
6. Export Realm Settings
For development purposes, it would be nice if the settings could be exported and imported again. This saves a lot of time. In the admin console, navigate to your realm and to Configure – Realm settings. Choose Action in the top right corner and click Partial export. Enable all options. Click the Export button.

The exported file is available in the repository.
7. Import Realm Settings
In order to import the realm settings, you need to recreate the mydeveloperplanet realm. In the admin console, navigate to your realm and to Configure – Realm settings. Choose Action in the top right corner and click Partial import. Drag the realm export file to the popup window. Enable all resources and choose to skip a resource when it already exists.

Last thing to do, is to create a user again and you are ready to go.
8. Create Container With Imported Data
If you want to do less manual actions, you can also use the command line export and import functionality of Keycloak.
Create a directory data and give it the necessary permissions (Keycloak will need to be able to access it).
mkdir data
chmod o+rwx data/
Create an initial Docker container in interactive mode. This way the container is started, but Keycloak itself is not running yet. You map the data directory as a volume into the container.
docker run -it -p 8081:8080 -e KC_BOOTSTRAP_ADMIN_USERNAME=admin -e KC_BOOTSTRAP_ADMIN_PASSWORD=admin -v "$PWD/data:/data" --entrypoint /bin/sh quay.io/keycloak/keycloak:26.1.4
In the container, you start Keycloak.
/opt/keycloak/bin/kc.sh start-dev
Navigate to http://localhost:8081/admin, login in and manually create the configuration or you use the steps as performed in paragraph Import Realm Settings.
Press CTRL+C in the container terminal in order to shutdown Keycloak. Keycloak may not be running when creating an export.
Export the mydeveloperplanet realm and exit the container.
/opt/keycloak/bin/kc.sh export --dir /data --realm mydeveloperplanet
exit
In the data directory, two files are created:
- mydeveloperplanet-realm.json
- mydeveloperplanet-users-0.json
Create a directory compose-realm/realms and copy these files into this directory.
Create a compose.yaml in directory compose-realm with the following content. Do note that the realms directory is mapped as a volume to directory /opt/keycloak/data/import inside the container and that argument --import-realm is added to the entry point.
services:
  keycloak:
    image: quay.io/keycloak/keycloak:26.1.4
    container_name: keycloak-realm
    environment:
      - KC_BOOTSTRAP_ADMIN_USERNAME=admin
      - KC_BOOTSTRAP_ADMIN_PASSWORD=admin
    ports:
      - "8081:8080"
    volumes:
      - ./realms:/opt/keycloak/data/import
    command: start-dev --import-realm
Ensure directory realm and the files can be accessed from within the container.
chmod o+rwx realms/
chmod o+rwx realms/*.json
Start the container.
docker compose up -d
Navigate to the admin console and verify that the mydeveloperplanet realm is available including the user gunter.
9. Conclusion
In this blog, you learned how to setup Keycloak in order to use the Authorization Code Flow. You also learned how the Authorization Code Flow works and which elements play a role. Now you are ready to start implementing this in your application.
Discover more from
Subscribe to get the latest posts sent to your email.
