
In this post we are going to take a look at Jib, a tool from Google in order to create Docker images in an easy and fast way. No need to create a Docker file, no need to install a Docker daemon, Jib just runs out-of-the-box.
1. Introduction
Up till now, we have been using the dockerfile-maven-plugin from Spotify in order to build and push our Docker images. This requires us to write a Docker file, according to best practices, to install a Docker daemon and to add the plugin to our build process. Jib will provide us a more easy way to create our Docker images. We only need to add and configure the Maven plugin and that is about it. Of course, we only believe this when we have tried it ourselves, and that is exactly what we are going to do.
We will create a simple Spring Boot application, containerize it with Jib Maven plugin and push it to Docker Hub. Next, we will pull the image and run the Docker container. The sources are available at GitHub.
We are using:
- Ubuntu 18.04
- Spring Boot 2.2.1
- Java 11
- Jib Maven Plugin 1.8.0
- An account at Docker Hub
More information about Jib can be found at the Google Cloud Platform Blog and at GitHub.
2. Create the Application
First, we will create a simple Spring Boot application. We add the Spring Actuator and Spring Web MVC dependencies to our pom. Spring Actuator will provide us the means to add health checks.
<dependency>
  <groupId>org.springframework.boot</groupId>
  <artifactId>spring-boot-starter-actuator</artifactId>
</dependency>
<dependency>
  <groupId>org.springframework.boot</groupId>
  <artifactId>spring-boot-starter-web</artifactId>
</dependency>
Our application consists out of a Rest controller which returns a hello message and the address of the machine.
@RestController
public class HelloController {

    @RequestMapping("/hello")
    public String hello() {
        StringBuilder message = new StringBuilder("Hello Jib Maven Plugin!");
        try {
            InetAddress ip = InetAddress.getLocalHost();
            message.append(" From host: " + ip);
        } catch (UnknownHostException e) {
            e.printStackTrace();
        }
        return message.toString();
    }

}
Run the application locally:
$ mvn spring-boot:run
After successful startup, we invoke the URL http://localhost:8080/hello which returns us the following message:
Hello Jib Maven Plugin! From host: gunter-Latitude-5590/127.0.1.1
3. Setup Jib and Docker Hub
In this section, we will add the Jib Maven plugin and ensure that we have a successful connection to Docker Hub Registry. It has been quite of a struggle in order to get this working properly, mainly due to a lack of documentation. The official Jib documentation is quite vague about secure authentication methods. Most of the examples consist of adding plain text credentials to the pom or to the Maven settings file. But that is not what we want. We want a secure way of connecting to Docker Hub by means of a Docker Credential Helper.
In order to test the connection, we add the Jib Maven plugin to our pom and configure it in order to retrieve a base image and to push this image to Docker Hub.
<plugin>
  <groupId>com.google.cloud.tools</groupId>
  <artifactId>jib-maven-plugin</artifactId>
  <version>1.8.0</version>
  <configuration>
    <!-- openjdk:11.0.5-jre -->
    <from>
      <image>openjdk:11.0.5-jre</image>
    </from>
    <to>
      <image>docker.io/${docker.image.prefix}/${project.artifactId}</image>
      <credHelper>pass</credHelper>
    </to>
  </configuration>
</plugin>
The from tag contains our base image, just like the FROM statement in a Docker file. The to tag contains the image we want to push. The ${docker.image.prefix} is set to mydeveloperplanet (our Docker Hub account), you will need to change this to your own account. The ${project.artifactId} contains the project artifact myjibplanet. In order to make use of a Credential Helper, we set the tag credHelper to pass.
Before starting, we need to set up a GPG key if you do not already have one, see also the Ubuntu help pages.
$ gpg --gen-key
For ease of use, you can add the generated key to your profile as an environment variable. Add the following line to your .profile where you replace Your_GPG_Key with your key.
export GPGKEY=Your_GPG_Key
Source your .profile in order to make the environment variable available.
$ source .profile
You can also choose to send your key to the Ubuntu keyserver, but it is not necessary in order to execute the next steps.
$ gpg --send-keys --keyserver keyserver.ubuntu.com $GPGKEY
Install pass and initialize a password store with your GPG key.
$ sudo apt install pass
$ pass init Your_GPG_Key

mkdir: created directory '/home/gunter/.password-store/'
Password store initialized for My Password Storage Key
Next thing to do, is to download and unpack the Docker Credential Helper and make the file executable.
$ wget https://github.com/docker/docker-credential-helpers/releases/download/v0.6.3/docker-credential-pass-v0.6.3-amd64.tar.gz
$ tar xvzf docker-credential-pass-v0.6.3-amd64.tar.gz
$ mv docker-credential-pass /usr/bin
$ chmod +x docker-credential-pass
The Docker Credential Helper needs to be configured correctly and this is where documentation falls short.
Create a config.json file with the following content. In the documentation it is stated to add the contents { "credStore": "pass" }, but with this configuration, Jib will not be able to connect to the Docker Hub Registry. We found the following issue where the use of credStore is not supported anymore for the Google Cloud Registry.
"credHelpers": {
"https://index.docker.io/v1": "pass"
}
Initialize the Docker Credential Helper. Enter the password pass is initialized when being asked for a password.
$ pass insert docker-credential-helpers/docker-pass-initialized-check
mkdir: created directory '/home/gunter/.password-store/docker-credential-helpers'
Enter password for docker-credential-helpers/docker-pass-initialized-check:
Retype password for docker-credential-helpers/docker-pass-initialized-check:
Check whether the password is correctly set:
$ pass show docker-credential-helpers/docker-pass-initialized-check
pass is initialized
Login with your Docker credentials. A warning is raised saying that your password is stored unencrypted in the file config.json. We could not figure out why this warning is being raised, because the credentials are stored encrypted in the config.json file.
$ docker login
Login with your Docker ID to push and pull images from Docker Hub. If you don't have a Docker ID, head over to https://hub.docker.com to create one.
Username: your_user_name
Password:
WARNING! Your password will be stored unencrypted in /home/gunter/.docker/config.json.
Configure a credential helper to remove this warning. See
https://docs.docker.com/engine/reference/commandline/login/#credentials-store

Login Succeeded
From now on, it is possible to execute docker login without the need for entering your credentials.
$ docker login
Authenticating with existing credentials...
WARNING! Your password will be stored unencrypted in /home/gunter/.docker/config.json.
Configure a credential helper to remove this warning. See
https://docs.docker.com/engine/reference/commandline/login/#credentials-store

Login Succeeded
You can logout again with docker logout:
$ docker logout
Removing login credentials for https://index.docker.io/v1/
Ensure that you are logged in again and run the Maven Jib build command:
$ mvn compile jib:build
The image is successfully build and pushed to Docker Hub. Two warnings are raised during the build:
Base image 'openjdk:11.0.5-jre' does not use a specific image digest - build may not be reproducible
This can be easily be solved by replacing openjdk:11.0.5-jre with the sha256 key for the base image openjdk@sha256:b3e19d27caa8249aad6f90c6e987943d03e915bbf3a66bc1b7f994a4fed668f6
The credential helper (docker-credential-pass) has nothing for server URL: https://index.docker.io/v1
This is a strange warning because the credentials for this URL are resolved and used for pushing the image.
4. Configure Jib for Our Application
Now that we have configured the authentication in a secure way, we can continue with configuring the Jib Maven plugin for our application. We add a tag to our image and specifiy the main class.
<to>
  <image>docker.io/${docker.image.prefix}/${project.artifactId}</image>
  <credHelper>pass</credHelper>
  <tags>
    <tag>${project.version}</tag>
  </tags>
</to>
<container>
  <mainClass>com.mydeveloperplanet.myjibplanet.MyJibPlanetApplication</mainClass>
</container>
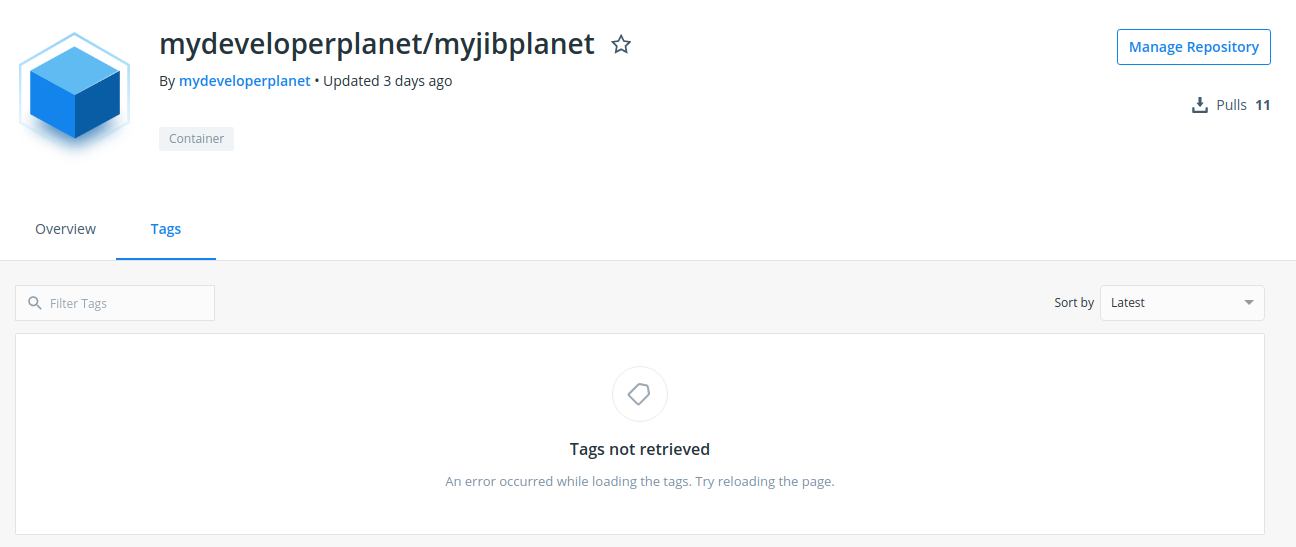
Do not add the tag format with value OCI to your container configuration. Docker Hub does not support yet OCI completely and an error message will be shown ‘An error occurred while loading the tags. Try reloading the page’ .
Build the image again and pull the Docker image:
$ docker pull mydeveloperplanet/myjibplanet
Using default tag: latest
latest: Pulling from mydeveloperplanet/myjibplanet
844c33c7e6ea: Pull complete
ada5d61ae65d: Pull complete
f8427fdf4292: Pull complete
a5217f27a28f: Pull complete
176e83ebae4f: Pull complete
800204250483: Pull complete
492e142ab90b: Pull complete
7c8e6198cd4b: Pull complete
c49bb7f02774: Pull complete
Digest: sha256:b7144bfdf6ee47d6b38914a84789ef9f7e2117320080b28ce39c385ee399a0c8
Status: Downloaded newer image for mydeveloperplanet/myjibplanet:latest
docker.io/mydeveloperplanet/myjibplanet:latest
Run the image and map it to port 8080:
$ docker run -p 127.0.0.1:8080:8080/tcp mydeveloperplanet/myjibplanet
...
2019-12-25 09:57:13.196 INFO 1 --- [nio-8080-exec-1] o.s.web.servlet.DispatcherServlet : Initializing Servlet 'dispatcherServlet'
2019-12-25 09:57:13.205 INFO 1 --- [nio-8080-exec-1] o.s.web.servlet.DispatcherServlet : Completed initialization in 9 ms
List the Docker containers:
$ docker ps
CONTAINER ID        IMAGE                           COMMAND                  CREATED             STATUS              PORTS                      NAMES
c05e431b0bd1        mydeveloperplanet/myjibplanet   "java -cp /app/resou…"   13 seconds ago      Up 12 seconds       127.0.0.1:8080->8080/tcp   recursing_meninsky
We only need to retrieve the IP address of our Docker container:
$ docker inspect c05e431b0bd1
...
  "NetworkSettings": {
    ...
    "IPAddress": "172.17.0.2",
  ...
  }
...
The URL of our application can now be invoked with http://172.17.0.2:8080/hello.
This returns us the welcome message:
Hello Jib Maven Plugin! From host: c05e431b0bd1/172.17.0.2
We have one more issue to solve: our application runs as root in the Docker container. This is not something we want because of security. First, we will check which users are available in the Docker container:
$ docker exec -it -u root c05e431b0bd1 cat /etc/passwd
...
nobody:x:65534:65534:nobody:/nonexistent:/usr/sbin/nologin
...
The Docker container contains a user nobody, which is the one we can use for running our application. Add the user tag to the pom:
<container>
  <mainClass>com.mydeveloperplanet.myjibplanet.MyJibPlanetApplication</mainClass>
  <user>nobody</user>
</container>
Build the image, pull it and run it. Verify with docker inspect whether nobody is used as user.
...
  "Config": {
    "Hostname": "76b3afaca3af",
    "Domainname": "",
    "User": "nobody",
    ...
  }
...
In our pom, we also added Spring Actuator. There is no option to add a Docker healthcheck via Jib. This must be resolved with liveness probe and readiness probe in the Kubernetes configuration, see also this issue.
5. Conclusion
We experimented with Jib Maven plugin in order to create our Docker images. Configuring the credentials for Docker Hub Registry was a real struggle, but once this was set up, the plugin is really easy to use. Besides that, no Docker daemon is needed and you do not need to write a separate Docker file. Last but not least, it is really fast. We will definitely be using this plugin in the near future.

small typo: “The ${project.artifactId} contains the version 1.0-SNAPSHOT.”,
should be: The ${project.artifactId} contains the artifactId myjibplanet.
Thanks for the post 🙂
LikeLiked by 1 person
You are absolutely right, I updated the post. Thank you for letting me know!
LikeLike
A few things are changed now. Can you please update this article as per new versions and docker urls?
LikeLiked by 1 person
Thank you for pointing this out. I have put it on my list to update the article, but cannot promise anything about a timeline for the update.
LikeLike